Irresistible Mini Cherry Pie Bites: A Sweet, Bite-Sized Delight
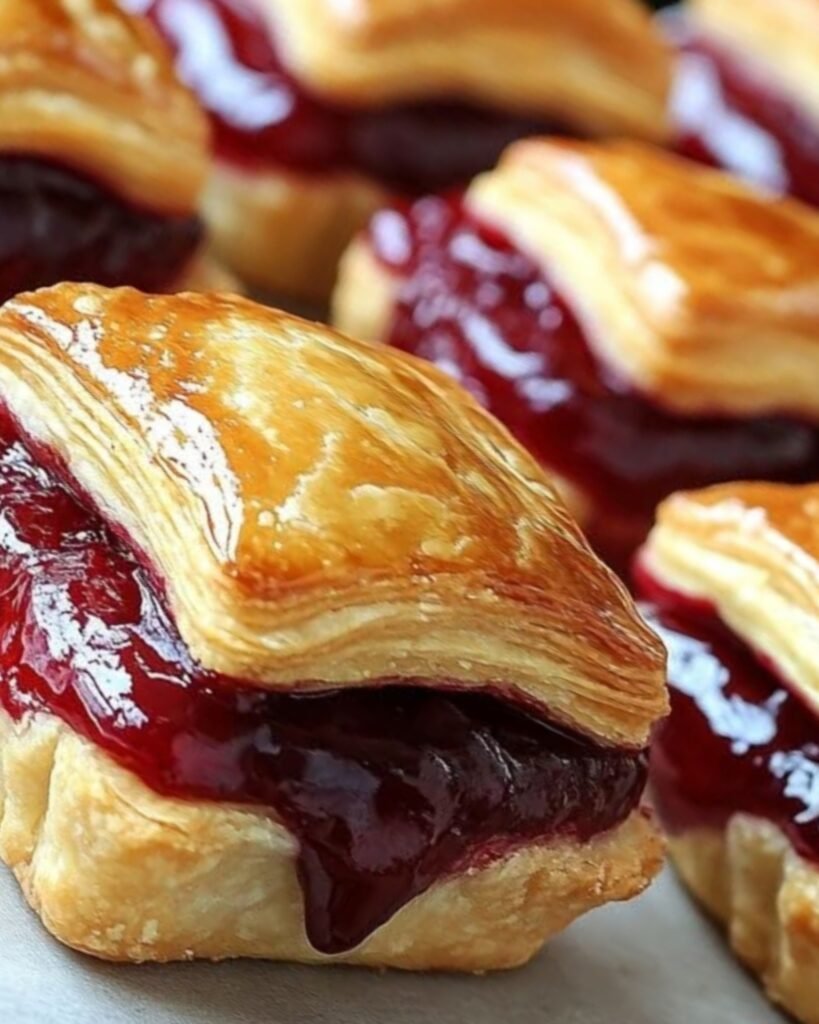
If you’re looking for a dessert that’s as adorable as it is delicious, these Mini Cherry Pie Bites are the perfect treat! These delightful morsels combine the classic flavors of a traditional cherry pie—flaky, buttery crust and sweet-tart cherry filling—in a portable, poppable size. Ideal for parties, potlucks, or a cozy night in, these bite-sized pies are easy to make and guaranteed to impress. Whether you’re a seasoned baker or a kitchen newbie, this recipe is simple yet yields bakery-worthy results. Let’s dive into how to create these crowd-pleasing mini pies!
Why You’ll Love These Cherry Pie Bites
These mini cherry pie bites are a fantastic twist on the classic cherry pie. Here’s why they’re a must-try:
- Portion-Perfect: Their small size makes them ideal for sharing or indulging without guilt.
- Quick and Easy: Using store-bought pie crusts cuts down on prep time, making this recipe beginner-friendly.
- Customizable: Swap out the cherry filling for your favorite fruit filling to suit any occasion.
- Versatile: Serve them at brunches, holiday gatherings, or as a sweet snack for kids and adults alike.
Ingredients (Makes Approximately 24 Mini Pie Bites)
To create these delectable treats, you’ll need just a handful of ingredients. Feel free to tweak them to match your taste or dietary preferences!
- 2 refrigerated pie crusts (1 package, typically containing 2 crusts) – Opt for high-quality, store-bought crusts for convenience, or make your own if you’re feeling ambitious.
- 1 ¼ cups cherry pie filling – Use a premium brand with whole or chunky cherries for the best texture, or make a homemade filling for extra freshness.
- 1 large egg – Beaten with a splash of water or milk for a glossy egg wash.
- 3 tablespoons coarse sugar (such as turbinado or granulated) – Adds a delightful crunch and sparkle to the finished bites.
- ¾ teaspoon ground cinnamon (optional) – For a warm, spiced note that complements the cherries.
- Optional: 1 teaspoon vanilla extract or almond extract – Stir into the cherry filling for a flavor boost.
- Optional: Powdered sugar – For a light dusting to enhance presentation.
Equipment Needed
- Baking sheet – A standard-sized sheet works perfectly.
- Parchment paper or silicone baking mat – Prevents sticking and makes cleanup a breeze.
- 2.5- to 3-inch round cookie cutter or drinking glass – For cutting the pie crusts into circles.
- Small spoon or cookie scoop – For portioning the filling.
- Pastry brush – For applying the egg wash.
- Rolling pin – To smooth out the pie crusts if needed.
- Small knife or fork – For crimping edges and cutting vents.
Step-by-Step Instructions
Follow these simple steps to create your own batch of mini cherry pie bites. The process is straightforward, but I’ve included extra tips to ensure success!
Step 1: Prepare Your Workspace
Preheat your oven to 400°F (200°C) and line a large baking sheet with parchment paper or a silicone baking mat. This ensures your pie bites won’t stick and makes cleanup effortless. Lightly flour a clean, flat surface (like a countertop or cutting board) to prevent the pie crust from sticking during rolling.
Step 2: Roll and Cut the Pie Crusts
Unroll the refrigerated pie crusts onto your floured surface. If the crusts feel stiff, let them sit at room temperature for 5–10 minutes to soften slightly. Using a rolling pin, gently roll out each crust to smooth any creases and make it slightly thinner (about 1/8-inch thick).
Use a 2.5- to 3-inch round cookie cutter (or the rim of a drinking glass) to cut out circles from the dough. Aim for an even number of circles, as each pie bite will require a top and bottom crust. You should get about 12–14 circles per crust, depending on the size of your cutter. Gather any dough scraps, re-roll them, and cut additional circles as needed.
Step 3: Add the Cherry Filling
Place half of the dough circles on the prepared baking sheet, spacing them about 1 inch apart. These will be the bottoms of your pie bites. Spoon approximately 1 teaspoon of cherry pie filling into the center of each circle. Be careful not to overfill, as too much filling can cause the pies to burst during baking.
Pro Tip: If your cherry pie filling contains large cherry pieces, chop them into smaller bits for easier filling and a more even distribution. For an extra flavor kick, stir 1 teaspoon of vanilla or almond extract into the filling before scooping.
Step 4: Top and Seal the Pie Bites
Place a second dough circle on top of each filled circle, aligning the edges. Gently press the edges together to seal, using your fingers or the tines of a fork to create a decorative crimp. This step is crucial to prevent the filling from leaking out during baking.
Use a small knife to cut a tiny slit or “X” in the top of each pie bite to allow steam to escape. Alternatively, you can poke a few holes with a fork.
Step 5: Apply the Egg Wash
In a small bowl, whisk together the egg with 1 teaspoon of water or milk to create an egg wash. Brush a thin layer over the top of each pie bite using a pastry brush. This gives the pies a beautiful golden sheen.
For a touch of sweetness and crunch, mix the coarse sugar with the ground cinnamon (if using) in a small bowl, then sprinkle generously over the tops of the pie bites.
Step 6: Bake to Perfection
Place the baking sheet in the preheated oven and bake for 15–18 minutes, or until the pie bites are golden brown and slightly puffed. Keep an eye on them to avoid over-browning. The aroma of warm cherries and buttery crust will fill your kitchen—pure bliss!
Once baked, remove the pie bites from the oven and let them cool on the baking sheet for 5 minutes before transferring them to a wire rack to cool completely.
Step 7: Serve and Enjoy
For an extra-special touch, dust the cooled pie bites with powdered sugar before serving. These mini pies are delicious warm or at room temperature, making them perfect for any occasion. Pair them with a scoop of vanilla ice cream, a dollop of whipped cream, or enjoy them on their own with a cup of coffee or tea.
Tips for Success
- Don’t Overfill: Too much filling can cause the pie bites to burst. Stick to a small teaspoon per bite.
- Chill the Dough: If the pie crust becomes too soft while working, pop it in the fridge for 10 minutes to firm up.
- Experiment with Fillings: Try apple, blueberry, or peach pie filling for variety. Adjust the sugar and spices to complement the fruit.
- Make Ahead: Assemble the pie bites and freeze them (unbaked) on a baking sheet. Once frozen, transfer to a freezer bag. Bake from frozen, adding 2–3 minutes to the baking time.
- Storage: Store leftovers in an airtight container at room temperature for up to 2 days or in the refrigerator for up to 5 days. Reheat in a 350°F oven for 5 minutes to restore crispness.
Serving Suggestions
These mini cherry pie bites are incredibly versatile. Here are a few ways to serve them:
- Party Platter: Arrange on a decorative tray for a festive dessert spread at birthdays or holiday gatherings.
- Dessert Charcuterie Board: Pair with fresh berries, chocolate-dipped strawberries, and mini cookies for a stunning presentation.
- Picnic Treat: Pack them in a tin for a portable, mess-free dessert at outdoor events.
- Kid-Friendly Snack: Their small size makes them perfect for little hands—great for lunchboxes or after-school treats.
Nutritional Information (Approximate, Per Pie Bite)
- Calories: 90–100 kcal
- Fat: 4g
- Carbohydrates: 13g
- Sugar: 6g
- Protein: 1g
Note: Nutritional values vary based on the brand of pie crust and filling used.
Why This Recipe Works for Your Website
This recipe is perfect for a food blog or website because it’s:
- Quick and Accessible: Uses pantry staples and store-bought ingredients, appealing to a wide audience.
- Visually Appealing: The golden, sugar-dusted pie bites are photogenic, ideal for food photography.
- Seasonally Versatile: Cherries evoke summer, but the recipe works year-round with canned or frozen filling.
- Engaging: The detailed instructions and tips make it approachable for beginners while offering creative ideas for experienced bakers.
Final Thoughts
These Mini Cherry Pie Bites are a delightful way to enjoy the timeless flavors of cherry pie in a fun, bite-sized format. With their flaky crust, juicy filling, and sugary crunch, they’re sure to become a favorite in your dessert repertoire. Try them for your next gathering, and watch them disappear faster than you can say “pie”!
Have you tried making mini pies before, or do you have a favorite filling to share? Let us know in the comments below, and don’t forget to share your creations on social media with #CherryPieBites!