Ultimate Yakiniku Sauce: The Perfect Dipping Sauce for Grilled Meats

Nothing elevates a sizzling plate of grilled meats quite like a vibrant, homemade Yakiniku Sauce. This Japanese-inspired dipping sauce, bursting with savory, tangy, and subtly sweet flavors, is the secret weapon for transforming your barbecue into an unforgettable feast. Whether you’re firing up the grill for tender beef, juicy pork, succulent chicken, or even charred vegetables, this versatile sauce delivers a punch of umami that will have your guests reaching for more. Ready to dive into the art of crafting this irresistible sauce? Let’s get started with a recipe that’s easy to whip up and guaranteed to impress!
Why Yakiniku Sauce is a Must-Have for Your BBQ
Yakiniku, which translates to “grilled meat” in Japanese, is a beloved style of barbecue where diners cook bite-sized pieces of meat and vegetables over a tabletop grill. The star of this experience is often the dipping sauce, known as tare, which enhances the smoky, caramelized flavors of the grill. This Yakiniku Sauce recipe draws inspiration from traditional Japanese flavors, blending soy sauce, sesame, and ginger with a touch of sweetness and acidity for a perfectly balanced condiment. Unlike store-bought versions, this homemade sauce lets you control the ingredients, ensuring freshness and authenticity in every bite.
Whether you’re hosting a backyard barbecue, enjoying a cozy indoor grill session, or simply looking to elevate your weeknight dinners, this sauce is your ticket to a restaurant-quality experience at home. Plus, it’s incredibly versatile—use it as a marinade, drizzle it over rice bowls, or even toss it with grilled veggies for a flavor-packed side dish.
Yakiniku Sauce Recipe
Prep Time: 10 minutes
Chill Time: 30 minutes (optional for enhanced flavor)
Total Time: 10-40 minutes
Yield: About ¾ cup (serves 4-6 as a dipping sauce)
Category: Condiment, Sauce
Cuisine: Japanese, Asian-Inspired
Ingredients
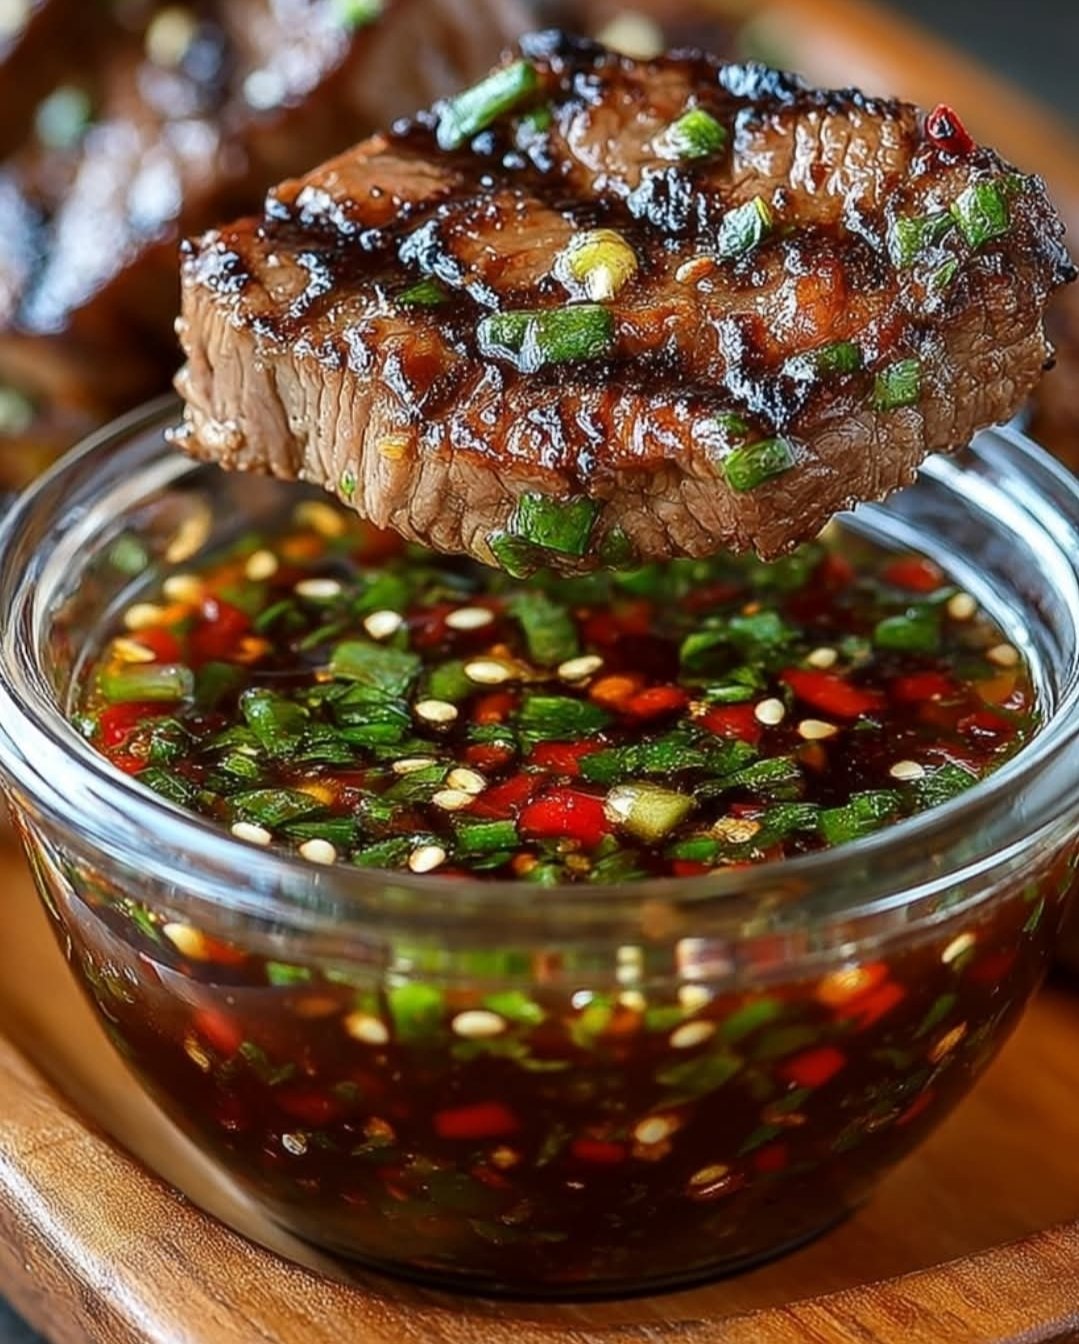
- ¼ cup low-sodium soy sauce (or tamari for a gluten-free option) – provides the salty, umami backbone of the sauce.
- 2 tablespoons rice vinegar – adds a bright, tangy note to balance the richness.
- 2 tablespoons mirin (Japanese sweet rice wine) – lends a subtle sweetness; substitute with honey or maple syrup for a twist.
- 1 tablespoon toasted sesame oil – infuses a nutty, aromatic depth.
- 2 teaspoons fresh ginger, finely grated – brings a warm, zesty kick.
- 2 medium garlic cloves, finely minced – for bold, savory flavor.
- 1 tablespoon granulated sugar – rounds out the flavors with a touch of sweetness.
- 1 tablespoon toasted sesame seeds – adds texture and a nutty crunch.
- 2-3 tablespoons green onions, thinly sliced (optional) – for a fresh, herbaceous garnish.
- ½ teaspoon red pepper flakes (optional) – for a gentle heat that spices things up.
Equipment Needed
- Small mixing bowl
- Whisk or fork
- Microplane or grater (for ginger)
- Measuring cups and spoons
- Airtight container (for storage)
Instructions
- Mix the Base Ingredients: In a small mixing bowl, combine ¼ cup soy sauce, 2 tablespoons rice vinegar, 2 tablespoons mirin, 1 tablespoon sesame oil, 2 teaspoons grated ginger, 2 minced garlic cloves, and 1 tablespoon sugar. Use a whisk or fork to stir vigorously until the sugar fully dissolves, creating a smooth, cohesive base. The aroma of ginger and garlic will start to awaken your senses!
- Incorporate the Add-Ins: Gently fold in 1 tablespoon of toasted sesame seeds for a delightful crunch. If you’re using green onions, add 2-3 tablespoons of the sliced greens for a pop of color and freshness. For those who enjoy a bit of spice, sprinkle in ½ teaspoon of red pepper flakes, adjusting to your heat preference.
- Let the Flavors Meld: Allow the sauce to rest at room temperature for at least 10 minutes to let the ingredients harmonize. For an even deeper flavor, cover the bowl and refrigerate the sauce for 30 minutes or up to overnight. This chilling step enhances the complexity, making each dip more tantalizing.
- Taste and Adjust: Before serving, give the sauce a quick taste. Want it sweeter? Add a pinch more sugar. Craving extra heat? Toss in a few more red pepper flakes. Customize it to suit your palate.
- Serve and Enjoy: Transfer the Yakiniku Sauce to small dipping bowls and serve alongside your favorite grilled meats, such as thinly sliced ribeye, pork belly, or chicken thighs. It’s also fantastic with grilled mushrooms, zucchini, or bell peppers. Garnish with extra sesame seeds or green onions for a restaurant-worthy presentation.
Pro Tips for the Best Yakiniku Sauce
- Toast Your Sesame Seeds: For maximum flavor, lightly toast raw sesame seeds in a dry skillet over medium heat for 2-3 minutes until golden and fragrant. Let them cool before adding to the sauce.
- Fresh Ingredients Matter: Use freshly grated ginger and minced garlic for the brightest, most vibrant flavors. Pre-grated or jarred versions can be convenient but often lack the same punch.
- Make It Ahead: This sauce tastes even better the next day as the flavors continue to meld. Prepare it up to 3 days in advance and store it in an airtight container in the fridge.
- Double the Batch: This recipe is easily scalable. Make a larger quantity for a crowd or to have leftovers for drizzling over rice, noodles, or stir-fries.
- Control the Sodium: If you’re watching your sodium intake, opt for low-sodium soy sauce or dilute the sauce with a splash of water or unsalted broth.
Variations to Try
Make this Yakiniku Sauce your own by experimenting with these creative twists:
- Citrus Zest: Add 1 teaspoon of orange or yuzu zest for a bright, citrusy lift.
- Miso Magic: Stir in 1 teaspoon of white or red miso paste for an extra layer of umami.
- Spicy Sriracha: Swap red pepper flakes for a teaspoon of sriracha or gochujang for a bold, spicy kick.
- Herb-Infused: Mix in finely chopped cilantro or shiso leaves for a fresh, herbal note.
- Fruity Twist: Blend in 1 tablespoon of grated apple or pear for a naturally sweet, Korean-inspired variation.
Serving Suggestions
This Yakiniku Sauce is incredibly versatile and pairs beautifully with a variety of dishes:
- Classic Yakiniku: Serve with thinly sliced beef short ribs (kalbi), pork belly, or chicken thighs grilled to perfection.
- Vegetarian Delight: Drizzle over grilled tofu, eggplant, or portobello mushrooms for a meat-free BBQ option.
- Rice Bowls: Spoon the sauce over steamed rice topped with grilled meats, a fried egg, and pickled veggies for a quick meal.
- Marinade Magic: Use the sauce as a marinade for meats or veggies before grilling—just reserve some for dipping to avoid cross-contamination.
- Appetizer Dip: Pair with crispy spring rolls, dumplings, or tempura for a flavorful starter.
Storage and Shelf Life
Store any leftover Yakiniku Sauce in an airtight container in the refrigerator for up to 1 week. Give it a good stir before serving, as the sesame oil and seeds may separate over time. For longer storage, freeze the sauce in ice cube trays for convenient, portion-sized servings that can be thawed as needed. Frozen sauce will keep for up to 3 months.
Nutritional Information (Approximate, Per 2-Tablespoon Serving)
- Calories: 50 kcal
- Fat: 3g (Saturated: 0.5g)
- Carbohydrates: 5g (Sugars: 4g)
- Protein: 1g
- Sodium: 600mg (varies based on soy sauce used)
Note: Nutritional values are estimates and may vary depending on specific ingredients and portion sizes.
Frequently Asked Questions
Can I make this sauce gluten-free?
Absolutely! Swap soy sauce for tamari or a gluten-free soy sauce alternative, and ensure your mirin is gluten-free (some brands may contain wheat).
What if I don’t have mirin?
No mirin? No problem! Substitute with 2 tablespoons of honey, maple syrup, or agave nectar mixed with a splash of water to mimic the sweetness and consistency.
How spicy is this sauce?
The sauce is mild as written, with optional red pepper flakes adding a gentle heat. Adjust the spice level by increasing or omitting the flakes, or try adding fresh chili slices for extra fire.
Can I use this as a stir-fry sauce?
Yes! Thin the sauce with a bit of water or broth and toss it with stir-fried meats, veggies, and noodles for a quick, flavorful dish.
Bring Your Grill Game to Life with Yakiniku Sauce
This homemade Yakiniku Sauce is more than just a condiment—it’s a flavor-packed experience that brings the sizzle of Japanese barbecue to your table. With its harmonious blend of salty soy, nutty sesame, and zesty ginger, it’s the perfect companion for any grilled dish. Whether you’re a seasoned grill master or a home cook looking to impress, this sauce will elevate your meals with minimal effort and maximum taste.
Ready to fire up the grill? Whip up a batch of this Yakiniku Sauce, gather your favorite meats and veggies, and let the flavors transport you to a lively Japanese BBQ. Don’t forget to share your creations with us in the comments below or tag us on social media—we’d love to see how you’re savoring this sauce!