Tender Oven-Braised Chuck Roast with Hearty Root Vegetables
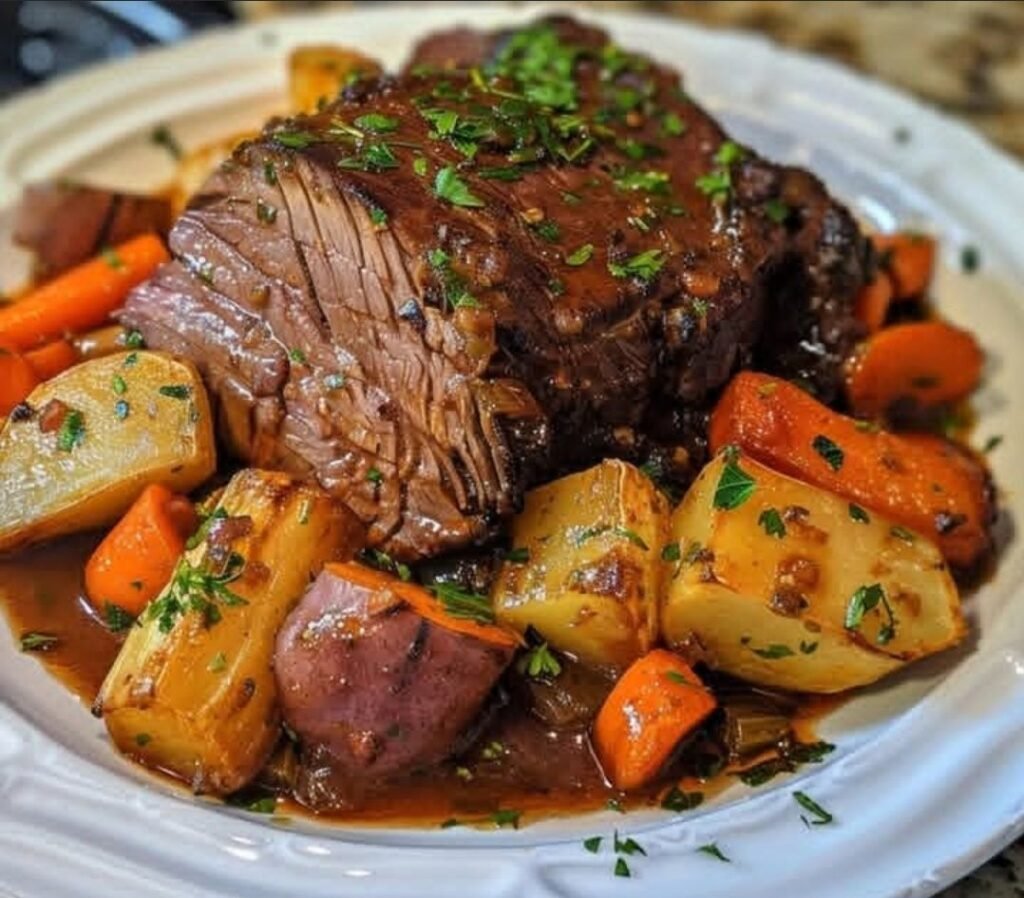
There’s something deeply satisfying about a classic braised chuck roast — the kind of dish that fills your home with rich, savory aromas and turns an affordable cut of beef into melt-in-your-mouth perfection. This recipe transforms a tough 3-pound chuck roast into fork-tender magic through low-and-slow oven braising. The meat simmers gently in a flavorful broth infused with garlic, herbs, and a touch of tomato for depth, while chunky root vegetables soak up all those delicious juices. It’s a complete one-pot meal that’s mostly hands-off once it hits the oven.
Chuck roast is an ideal choice here because its marbling (those streaks of fat) breaks down during the long cook time, keeping the meat juicy and tender. Paired with sweet carrots, earthy parsnips, and crisp celery, this dish balances hearty protein with naturally sweet, comforting veggies. It’s the ultimate cold-weather comfort food — think Sunday supper, holiday gatherings, or just a cozy night in.
Why You’ll Love This Recipe
- Incredibly tender results every time with minimal effort.
- One-pot wonder — minimal cleanup.
- Budget-friendly using an economical cut of beef.
- Naturally gluten-free and adaptable (see variations below).
- Make-ahead friendly — tastes even better the next day.
Ingredients (Serves 6 generous portions)
- 3 pounds boneless beef chuck roast (look for good marbling)
- Kosher salt and freshly ground black pepper (to taste — be generous!)
- 2 tablespoons olive oil (or avocado oil for higher heat tolerance)
- 1 large yellow onion, thinly sliced
- 4 large garlic cloves, minced (or 6 if you love garlic)
- 2 cups low-sodium beef broth (or homemade stock for extra flavor)
- 2 tablespoons tomato paste (adds umami and subtle richness)
- 1 teaspoon dried thyme (or 1 tablespoon fresh thyme sprigs)
- 2 dried bay leaves
- 3 medium carrots, peeled and cut into 2-inch chunks
- 2 large parsnips, peeled and cut into 2-inch chunks (their sweetness pairs beautifully with the beef)
- 2–3 stalks celery, trimmed and cut into 2-inch chunks
- Optional add-ins for extra flavor: ½ cup dry red wine (like Cabernet or Merlot) to deglaze, or a sprig of fresh rosemary
Equipment Needed
- Large Dutch oven or heavy oven-safe pot with a tight-fitting lid (5–7 quart size works best)
- Tongs for searing
- Wooden spoon or spatula
Instructions
- Prep the Meat
Remove the chuck roast from the fridge 30–60 minutes before cooking so it comes to room temperature — this helps it cook more evenly. Pat the roast dry with paper towels (moisture prevents a good sear). Season all sides generously with kosher salt and freshly cracked black pepper. Don’t skimp here; seasoning is key to building flavor. - Sear for Flavor
Preheat your oven to 325°F (163°C). Heat the olive oil in your Dutch oven over medium-high heat until shimmering. Carefully add the seasoned roast and sear undisturbed for 4–5 minutes per side until a deep golden-brown crust forms. This Maillard reaction creates incredible flavor — don’t rush it! Once browned on all sides (including the edges), transfer the roast to a plate and set aside. - Build the Braising Base
Reduce the heat to medium. In the same pot (with all those tasty browned bits), add the sliced onion. Cook for 3–4 minutes, stirring occasionally, until softened and starting to turn translucent. Add the minced garlic and cook for another 1 minute until fragrant — be careful not to burn it. - Deglaze and Season the Liquid
Stir in the tomato paste and cook for 1–2 minutes to caramelize it slightly (this deepens the flavor). If using red wine, pour it in now and scrape up any browned bits from the bottom. Let it simmer for 1 minute to reduce slightly. Pour in the beef broth, then add the dried thyme and bay leaves. Stir everything together and bring the mixture to a gentle simmer. - Slow Braise the Roast
Nestle the seared chuck roast back into the pot, spooning some liquid over the top. The liquid should come about halfway up the meat — add a splash more broth if needed. Cover tightly with the lid and transfer to the preheated oven. Braise for 2 hours undisturbed. After 2 hours, carefully remove the pot and add the carrot, parsnip, and celery chunks, tucking them around the meat. This timing ensures the vegetables cook until tender but don’t turn mushy. Cover again and return to the oven for another 1–1.5 hours (total braising time: 3–3.5 hours). The roast is done when it shreds easily with a fork or reaches an internal temperature of about 200–205°F for ultimate tenderness. - Rest and Serve
Remove the pot from the oven and let it rest for 10–15 minutes (this helps the juices redistribute). Discard the bay leaves. Transfer the roast to a cutting board and slice against the grain or shred it with two forks. Spoon the vegetables and plenty of the rich braising liquid over the top — the liquid turns into a natural, flavorful “gravy” as it thickens slightly upon standing. Serve hot, family-style straight from the pot, or plate individually. Garnish with fresh chopped parsley if desired for a pop of color.
Prep Time: 20 minutes
Cook Time: 3–3.5 hours
Total Time: About 3 hours 50 minutes to 4 hours
Calories: Approximately 450–500 kcal per serving (varies based on exact portions and trimming)
Servings: 6
Pro Tips for the Most Tender Results
- Don’t skip the searing step — it adds layers of flavor.
- Use a tight-fitting lid to trap moisture and prevent drying out.
- If the liquid reduces too much during cooking, add a bit more broth.
- For even more tenderness, braise up to 4 hours if your roast is particularly thick.
- Leftovers store beautifully in the fridge for 3–4 days or freeze for up to 3 months. Reheat gently on the stovetop with a splash of broth.
Variations to Try
- Add potatoes (Yukon gold or red) in the last hour for a heartier version.
- Swap parsnips for turnips or rutabaga for a different root veggie twist.
- Make it wine-forward by replacing half the broth with dry red wine.
- For a thicker gravy, remove the meat and veggies at the end, then simmer the liquid on the stovetop and whisk in a cornstarch slurry.
This dish pairs wonderfully with crusty bread, mashed potatoes, or a simple green salad to balance the richness. Enjoy the cozy vibes — it’s comfort food at its finest!
Feel free to tweak seasonings to your taste and share your results. Happy cooking!