Strawberry Cheesecake Chimichangas: A Decadent Dessert Taco You’ll Wish You Tried Sooner! 🍓🌮
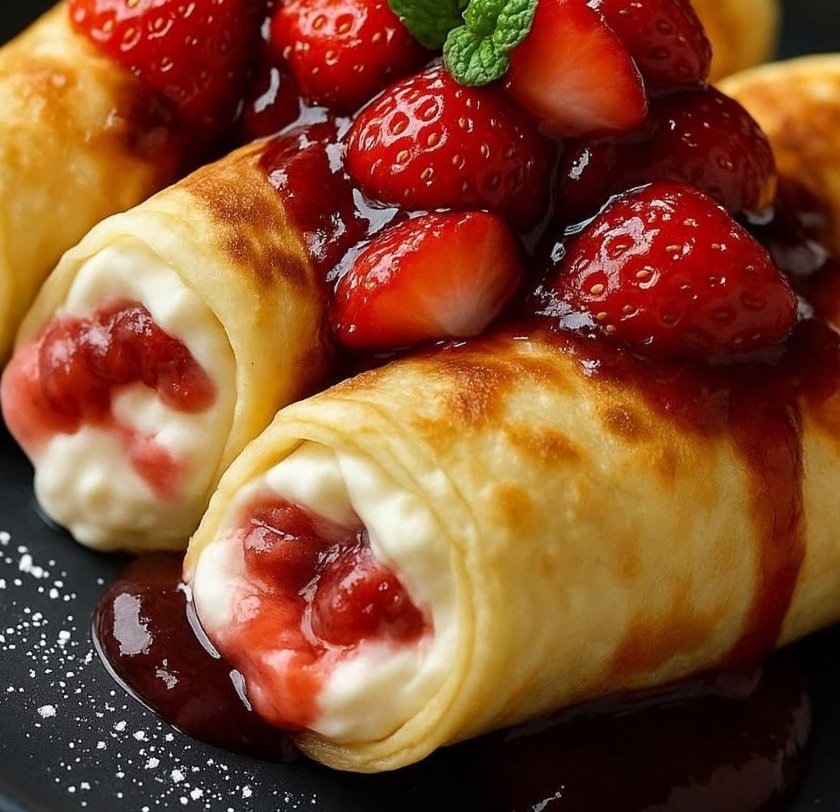
Imagine biting into a crispy, golden tortilla wrapped around a creamy, tangy cheesecake filling bursting with juicy strawberries. These Strawberry Cheesecake Chimichangas are the ultimate fusion of indulgent dessert and Tex-Mex flair, delivering a sweet, crispy treat that’s perfect for parties, cozy nights in, or whenever you’re craving something extraordinary. This recipe transforms simple ingredients into a show-stopping dessert that’s surprisingly easy to make. Whether you fry them to golden perfection or bake them for a lighter twist, these dessert chimichangas are guaranteed to steal the spotlight!
Prep Time: 15 minutes
Cook Time: 10 minutes (frying) or 20 minutes (baking)
Total Time: 25-35 minutes
Servings: 4 chimichangas
Difficulty: Easy
Ingredients for Your Dessert Adventure
To create these delightful chimichangas, gather the following ingredients. Each one plays a key role in building layers of flavor and texture:
- 4 large (10-inch) flour tortillas – Burrito-sized tortillas work best for wrapping the generous filling.
- 8 oz cream cheese, softened – Full-fat cream cheese delivers the richest texture, but light versions work too.
- 1/3 cup confectioners’ sugar – Also known as powdered sugar, it sweetens the filling without graininess.
- 1 tsp pure vanilla extract – Adds warmth and depth to the cheesecake mixture.
- 1 cup fresh strawberries, finely diced – Fresh berries bring vibrant flavor; frozen can work in a pinch (thaw and drain first).
- 1 tbsp granulated sugar – Enhances the strawberries’ natural sweetness.
- 1 tbsp fresh lemon juice – Brightens the strawberry filling with a zesty kick.
- 1 tsp cornstarch (optional) – Helps thicken the strawberry juices for a less runny filling.
- Vegetable oil for frying – Use a neutral oil like canola or grapeseed for frying; or cooking spray if baking.
- Powdered sugar and ground cinnamon – For a classic, snowy dusting that adds sweetness and spice.
- Optional toppings – Whipped cream, homemade or store-bought strawberry sauce, or even a scoop of vanilla ice cream for extra decadence.
Step-by-Step Instructions for Dessert Bliss
Follow these steps to create your own batch of Strawberry Cheesecake Chimichangas. Whether you’re a seasoned cook or a kitchen newbie, this recipe is approachable and fun!
- Prepare the Strawberry Filling
Start by prepping the star of the show: the strawberries. In a small mixing bowl, combine the diced strawberries, granulated sugar, lemon juice, and cornstarch (if using). Gently toss to coat the berries evenly. Let them sit for about 10 minutes to macerate—this process draws out the strawberries’ natural juices, creating a sweet, slightly syrupy mixture that pairs perfectly with the creamy filling. The cornstarch, if used, will thicken the juices to prevent a soggy chimichanga. - Whip Up the Cheesecake Filling
In a medium bowl, use a hand mixer or a sturdy whisk to blend the softened cream cheese, confectioners’ sugar, and vanilla extract until velvety smooth. The goal is a luscious, spreadable filling that’s sweet but not overpowering. Scrape down the sides of the bowl to ensure everything is well combined. Pro tip: If the cream cheese isn’t soft enough, microwave it for 10-15 seconds to make mixing easier. - Assemble Your Chimichangas
Lay out the four flour tortillas on a clean, flat surface. Divide the cheesecake filling evenly among them, spreading a generous layer (about 2-3 tablespoons) in the center of each tortilla, leaving a 2-inch border around the edges. Next, spoon a portion of the macerated strawberries over the cream cheese layer. Be careful not to overfill—too much filling can make rolling tricky and lead to leaks during cooking. - Roll Like a Pro
To form the chimichangas, fold the left and right sides of each tortilla inward over the filling, then roll from the bottom up to create a tight, burrito-like package. If the tortilla doesn’t seal easily, dab a little water along the edge to help it stick. A secure roll is key to keeping the filling inside during cooking, so take your time to tuck everything in snugly. - Choose Your Cooking Method
You have two options for cooking these chimichangas, depending on your preference for indulgence or ease:
- Frying (For Maximum Crunch): Pour about 1 inch of vegetable oil into a large skillet and heat over medium heat until it reaches 350°F (175°C). If you don’t have a thermometer, test the oil by dropping in a small piece of tortilla—it should sizzle immediately. Place the chimichangas seam side down in the hot oil and fry for 2-3 minutes per side, turning carefully with tongs, until they’re golden brown and crispy. Remove and drain on a plate lined with paper towels to soak up excess oil.
- Baking (For a Lighter Option): Preheat your oven to 400°F (200°C). Place the chimichangas seam side down on a baking sheet lined with parchment paper or a silicone mat. Lightly coat each chimichanga with cooking spray to help them crisp up. Bake for 15-20 minutes, flipping halfway through, until they’re golden and crunchy. This method is lower in fat but still delivers great texture.
- Add the Finishing Touches
Once cooked, let the chimichangas cool for a minute or two—they’ll be piping hot! Dust them generously with a mix of powdered sugar and a pinch of ground cinnamon for a sweet, aromatic finish. For an extra touch of decadence, serve with a dollop of whipped cream, a drizzle of strawberry sauce, or even a scoop of vanilla ice cream. Serve immediately while they’re warm and crispy for the best experience.
Nutritional Information (Approximate, Per Chimichanga)
These values are estimates based on standard ingredient measurements and frying method. Baking will reduce the fat and calorie content slightly.
- Calories: 350 kcal
- Protein: 6g
- Carbohydrates: 45g
- Fat: 15g
- Sugar: 18g
- Sodium: 300mg
For precise nutritional data, consider inputting your exact ingredient brands and quantities into a nutrition calculator, as values can vary.
Tips for Perfect Chimichangas
- Keep Tortillas Pliable: If your tortillas are stiff or cracking when you roll them, warm them in the microwave for 10-15 seconds between damp paper towels to make them soft and flexible.
- Control the Oil Temperature: For frying, maintain a consistent oil temperature to avoid greasy chimichangas (too low) or burnt exteriors (too high). A thermometer is your best friend here.
- Make Ahead: You can assemble the chimichangas up to a day in advance and store them in the fridge, tightly wrapped. Fry or bake just before serving for maximum freshness.
- Customize the Filling: Swap strawberries for other fruits like blueberries, raspberries, or peaches for a seasonal twist. Just adjust the sugar and lemon juice to taste.
Creative Variations to Try
- Chocolate Lover’s Twist: Add a handful of mini chocolate chips to the cheesecake filling for a decadent strawberry-chocolate combo.
- Nutty Crunch: Sprinkle crushed graham crackers or chopped nuts (like almonds or pecans) over the filling before rolling for added texture.
- Air Fryer Option: For a modern twist, cook the chimichangas in an air fryer at 375°F (190°C) for 8-10 minutes, shaking the basket halfway through, until crispy.
- Vegan Version: Use plant-based cream cheese, vegan tortillas, and skip the whipped cream or use a dairy-free alternative to make this recipe vegan-friendly.
Why You’ll Love These Chimichangas
Strawberry Cheesecake Chimichangas are more than just a dessert—they’re a conversation starter! The contrast of the crispy tortilla with the creamy, fruity filling is pure magic, and the versatility of frying or baking makes them accessible for any home cook. They’re perfect for summer barbecues, holiday dessert tables, or a fun family cooking project. Plus, they’re endlessly customizable, so you can tweak them to suit your taste or dietary needs.
Serving Suggestions and Pairings
Serve these chimichangas warm for the ultimate texture contrast. Pair them with a scoop of vanilla or strawberry ice cream for a classic dessert vibe, or drizzle with caramel sauce for an extra layer of indulgence. For a refreshing contrast, offer a side of fresh berries or a mint-infused fruit salad. If you’re hosting a party, set up a “chimichanga bar” with various toppings like chocolate sauce, crushed cookies, or sprinkles so guests can customize their own.
For beverages, try pairing with a chilled glass of sparkling rosé, a fruity iced tea, or a creamy hot chocolate for cooler evenings. The bright strawberry notes and rich cream cheese make these chimichangas versatile enough to complement a range of drinks.
Storing and Reheating
If you have leftovers (though they’re so delicious, that’s unlikely!), store them in an airtight container in the refrigerator for up to 2 days. To reheat, pop them in a 350°F (175°C) oven or air fryer for 5-7 minutes to restore their crispiness. Avoid microwaving, as it can make the tortillas soggy. Freezing is not recommended, as the cream cheese filling may separate upon thawing.