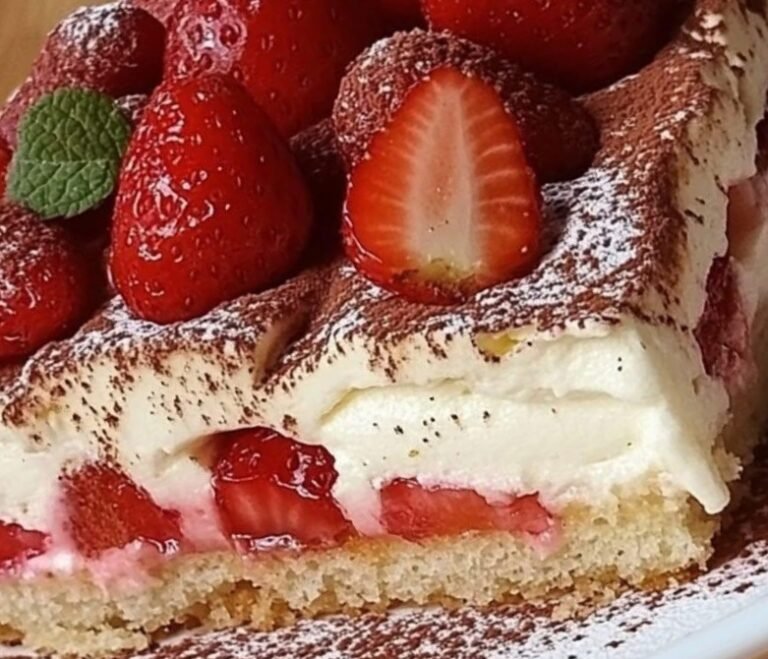
No-Bake Tiramisu Pudding Cups: A Quick & Elegant Dessert

Craving the rich, creamy flavors of classic tiramisu but want something easier and perfect for individual servings? These No-Bake Tiramisu Pudding Cups are your answer! With layers of coffee-soaked ladyfingers, velvety mascarpone cream, and instant vanilla pudding, this dessert is a crowd-pleaser that’s ready in just 20 minutes. Plus, it’s make-ahead friendly, so you can chill and serve whenever you’re ready. Let’s dive into this indulgent treat!

Why You’ll Love Tiramisu Pudding Cups
- No-Bake Simplicity: No oven required, just mix, layer, and chill.
- Perfect for Parties: Individual cups look elegant in glasses or mason jars.
- Customizable: Swap ingredients or add a twist with chocolate or coffee pudding.
- Make-Ahead Magic: Tastes even better after chilling overnight.
Recipe Details
- Prep Time: 20 minutes
- Chill Time: 2–4 hours (or overnight for best results)
- Servings: 6–8 cups
- Difficulty: Easy
Ingredients
For the Cream Layer
- 1 cup (240 ml) heavy whipping cream
- 8 oz (225 g) mascarpone cheese, softened
- 1/3 cup (40 g) powdered sugar
- 1 tsp vanilla extract
For the Pudding
- 1 (3.4 oz / 96 g) box instant vanilla pudding mix
- 1 ¾ cups (420 ml) cold milk
For the Coffee Layer
- 1 cup (240 ml) strong brewed coffee or espresso, cooled
- 1 tbsp coffee liqueur (optional, e.g., Kahlúa)
Others
- 12–16 ladyfinger cookies (or graham crackers/vanilla wafers)
- Unsweetened cocoa powder, for dusting
- Optional: chocolate shavings or mini chocolate chips for garnish
Instructions
- Prepare the Pudding
In a medium bowl, whisk the instant vanilla pudding mix with cold milk for 2 minutes until thickened. Set aside to firm up. - Whip the Cream
In a separate bowl, beat the heavy whipping cream until soft peaks form. - Make the Mascarpone Cream
In another bowl, mix softened mascarpone, powdered sugar, and vanilla extract until smooth. Gently fold in the whipped cream for a light, fluffy mixture. - Optional: Combine Layers
For a silkier texture, fold the pudding into the mascarpone cream. Alternatively, keep them separate for distinct layers. - Prepare the Coffee Dip
In a shallow bowl, combine cooled coffee with coffee liqueur (if using). - Assemble the Cups
In small dessert cups or jars:
- Break ladyfingers in half and dip briefly (1–2 seconds) in the coffee mixture.
- Place a layer of soaked ladyfingers at the bottom of each cup.
- Spoon a layer of mascarpone cream (or pudding-cream mixture) over the ladyfingers.
- Repeat with another layer of ladyfingers and cream.
- Smooth the tops with a spoon or spatula.
- Chill
Cover the cups and refrigerate for 2–4 hours, or overnight for the best flavor and texture. - Serve
Before serving, dust the tops with unsweetened cocoa powder and garnish with chocolate shavings or mini chocolate chips, if desired.
Pro Tips for Perfect Tiramisu Cups
- Don’t Oversoak: Ladyfingers absorb liquid quickly, so dip them briefly to avoid mushiness.
- Mix It Up: Try chocolate or coffee-flavored pudding for a fun twist.
- Presentation: Use clear glasses or mason jars to show off the beautiful layers.
- Make Ahead: These cups taste even better the next day, making them ideal for parties or gatherings.
Serving Suggestions
Serve these tiramisu pudding cups chilled for a refreshing, indulgent treat. Pair with a hot espresso or cappuccino for the ultimate coffee-lover’s dessert experience. They’re perfect for dinner parties, holidays, or any time you want a fancy dessert without the fuss!
Want More Dessert Inspiration?
Love easy, no-bake desserts? Check out our No-Bake Cheesecake Cups or Chocolate Mousse Parfaits for more crowd-pleasing ideas! Don’t forget to pin this recipe to your Pinterest board or share it with friends.
Download a Printable Version: Click here for a beautifully formatted PDF of this recipe to keep in your kitchen!
What’s your favorite way to enjoy tiramisu? Let us know in the comments below, and happy dessert-making!