Mom’s Homemade Delight: Irresistible Cream Puffs Recipe
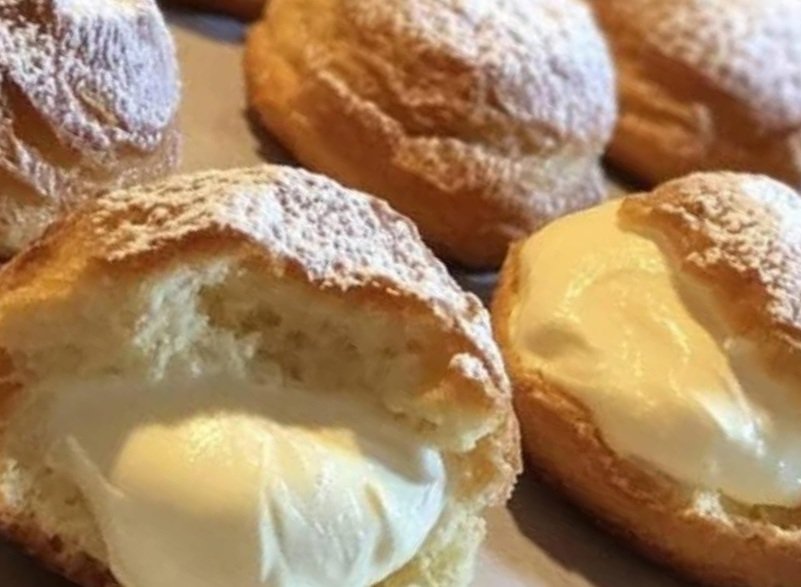
Welcome to a delightful journey into the world of baking with our very own Mom’s Homemade Cream Puffs! These light, airy pastries filled with a luscious vanilla cream are the perfect treat for any occasion—be it a family gathering, a cozy afternoon tea, or a special celebration. Inspired by the timeless love of home cooking, this recipe brings a touch of nostalgia and warmth to your kitchen. With a golden, crisp exterior and a melt-in-your-mouth filling, these cream puffs are sure to become a family favorite. Let’s dive into the process of creating these heavenly treats, which yield approximately 12–15 cream puffs depending on size.
Why You’ll Love This Recipe
Cream puffs, also known as profiteroles in some parts of the world, are a versatile dessert that can be enjoyed as is or dressed up with chocolate ganache, fruit compote, or whipped cream toppings. This recipe uses simple ingredients you likely already have in your pantry, making it an accessible yet impressive addition to your baking repertoire. The choux pastry technique might seem intimidating at first, but with our detailed instructions, you’ll master it in no time. Plus, the optional vanilla extract adds a subtle depth of flavor that elevates the entire experience.
Ingredients
For the Choux Pastry:
- ½ cup (1 stick) unsalted butter – Ensure it’s at room temperature for easier blending.
- 1 cup water – Use filtered water for the best results.
- 1 teaspoon vanilla extract – A splash of this enhances the pastry’s flavor (feel free to adjust to taste).
- 1 cup all-purpose flour – Sifted to avoid lumps and ensure a smooth dough.
- 4 large eggs – Room temperature eggs incorporate better into the dough.
- A pinch of salt – To balance the flavors.
For the Vanilla Cream Filling:
- 2 cups whole milk – Provides richness to the custard.
- ½ cup granulated sugar – Adjust sweetness to your preference.
- 4 large egg yolks – The key to a silky custard.
- ¼ cup cornstarch – Thickens the filling perfectly.
- 1 tablespoon unsalted butter – Adds a glossy finish.
- 1 teaspoon vanilla extract – For that classic vanilla aroma.
For Dusting:
- Powdered sugar – To give your cream puffs that classic, snowy look.
Equipment You’ll Need
- Medium saucepan
- Wooden spoon or silicone spatula
- Mixing bowl
- Whisk
- Piping bag with a round tip (or a zip-top bag with a corner snipped off)
- Baking sheet
- Parchment paper
- Electric mixer (optional for the filling)
Step-by-Step Instructions
Step 1: Preparing the Choux Pastry
- Preheat the Oven: Start by preheating your oven to 400°F (200°C). Line a baking sheet with parchment paper to prevent sticking and ensure even baking.
- Melt the Base: In a medium saucepan, combine the water, butter, and a pinch of salt. Place it over medium heat, stirring occasionally until the butter melts completely and the mixture begins to simmer gently.
- Add Flour: Remove the pan from the heat and quickly stir in the sifted flour all at once. Use a wooden spoon or spatula to mix vigorously until the dough forms a smooth ball and pulls away from the sides of the pan. This should take about 1–2 minutes.
- Cool Slightly: Transfer the dough to a mixing bowl and let it cool for 5 minutes. This step is crucial to prevent the eggs from cooking when added.
- Incorporate Eggs: Add the eggs one at a time, beating well after each addition until the dough is glossy and smooth. The mixture might look curdled at first, but keep mixing—it will come together. Stir in the vanilla extract for an extra layer of flavor.
- Pipe the Dough: Transfer the dough to a piping bag fitted with a round tip. Pipe 1.5-inch mounds onto the prepared baking sheet, spacing them about 2 inches apart. Wet your finger with water and gently smooth any peaks to ensure even baking.
Step 2: Baking the Puffs
- Bake: Place the baking sheet in the preheated oven and bake for 20–25 minutes, or until the puffs are golden brown and puffed up. Avoid opening the oven door during the first 20 minutes to prevent collapse.
- Cool: Remove the puffs from the oven and let them cool completely on a wire rack. This helps them set and maintain their structure.
Step 3: Making the Vanilla Cream Filling
- Heat the Milk: In a saucepan, warm the milk over medium heat until it just begins to simmer. Remove from heat.
- Whisk the Base: In a bowl, whisk together the egg yolks, sugar, and cornstarch until smooth and pale.
- Combine: Slowly pour the warm milk into the egg mixture, whisking constantly to avoid curdling. Return the mixture to the saucepan and cook over medium heat, stirring continuously, until it thickens into a custard (about 5–7 minutes).
- Finish the Filling: Remove from heat and stir in the butter and vanilla extract. Transfer to a bowl, cover with plastic wrap (pressing it directly onto the surface to prevent a skin from forming), and chill in the refrigerator for at least 1 hour.
Step 4: Assembling the Cream Puffs
- Fill the Puffs: Once the puffs and filling are cooled, use a piping bag or a small knife to create a hole in the bottom or side of each puff. Fill with the vanilla cream until plump.
- Dust with Sugar: Sift powdered sugar over the top for a beautiful finish.
Serving Suggestions
Serve these cream puffs fresh for the best texture, though they can be stored in an airtight container in the refrigerator for up to 2 days. For an extra treat, drizzle with melted chocolate or pair with fresh berries. They’re perfect for brunches, desserts, or even as a midday snack with a cup of coffee or tea.
Tips for Success
- Consistency is Key: The choux dough should be thick but pipeable. If it’s too runny, add a bit more flour; if too stiff, add an extra egg yolk.
- Avoid Overfilling: Too much cream can make the puffs soggy—aim for a balanced fill.
- Experiment: Try adding a hint of almond extract or a sprinkle of cinnamon to the dough for a unique twist.
Storage
Store unfilled puffs in an airtight container at room temperature for up to 2 days, or freeze for up to a month. Fill them just before serving to maintain crispness.
Enjoy the process of baking these delightful cream puffs, and share the love with family and friends. Happy baking!