Homemade Coffee Ice Cream: A Creamy, Dreamy Delight ☕🍦
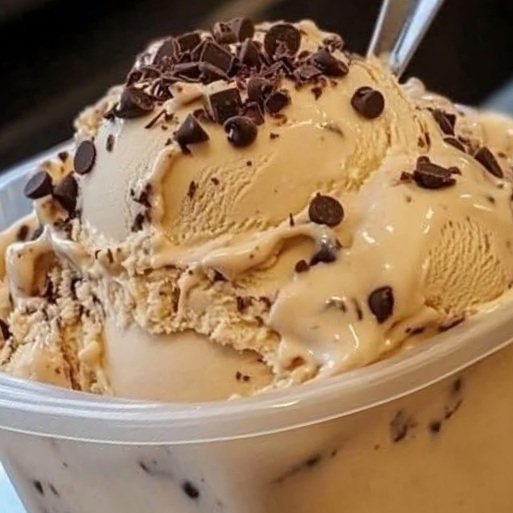
If you’re a coffee lover with a sweet tooth, this homemade coffee ice cream is about to become your new obsession! This no-churn recipe is simple, decadent, and bursting with rich coffee flavor, balanced by the creamy sweetness of condensed milk and a touch of chocolatey flair. Whether you’re hosting a summer gathering, treating yourself after a long day, or just craving a frozen dessert with a caffeine kick, this recipe delivers pure bliss in every scoop. Best of all, you don’t need an ice cream maker—just a few pantry staples and a little patience while it freezes. Let’s dive into this indulgent treat that’s sure to impress!
Why You’ll Love This Coffee Ice Cream
This recipe is a game-changer for coffee enthusiasts. The bold, aromatic notes of coffee blend seamlessly with the velvety texture of whipped cream and the luscious sweetness of condensed milk. The result? A frozen dessert that’s creamy, smooth, and perfectly balanced. Plus, it’s customizable—top it with chocolate drizzles, sprinkle on some crushed espresso beans, or even swirl in caramel for a gourmet twist. With minimal ingredients and straightforward steps, this coffee ice cream is beginner-friendly yet sophisticated enough to serve at a dinner party.
Ingredients (Serves 6–8)
To create this irresistible coffee ice cream, you’ll need just a handful of ingredients. Here’s what to gather:
- 350 ml (1½ cups) heavy whipping cream, chilled (at least 35% fat for the best texture)
- 3 tablespoons instant coffee granules (adjust to taste for a stronger or milder coffee flavor)
- 290 ml (1 can, about 10 oz) sweetened condensed milk, chilled
- Dark or milk chocolate, melted, for drizzling (optional, but highly recommended)
- Optional add-ins: Crushed coffee beans, chocolate chips, or a pinch of cinnamon for extra flair
Equipment Needed:
- Large mixing bowl (preferably metal or glass, chilled)
- Hand mixer or whisk
- Spatula
- Freezer-safe container (a loaf pan or shallow dish works great)
- Plastic wrap or airtight lid
Step-by-Step Instructions
Follow these simple steps to whip up a batch of coffee ice cream that’s sure to steal the show. The process is straightforward, but a few pro tips will ensure your ice cream turns out perfectly creamy and scoopable.
Step 1: Prep for Success
For the creamiest results, chill your whipping cream, condensed milk, mixing bowl, and beaters (or whisk) in the refrigerator for at least 15–20 minutes before starting. Cold ingredients and tools help the cream whip up faster and hold its structure, giving your ice cream that dreamy texture.
Step 2: Infuse the Cream with Coffee
In your chilled mixing bowl, pour in the 350 ml of heavy whipping cream. Sprinkle in the 3 tablespoons of instant coffee granules. Using a hand mixer (or a whisk if you’re feeling strong), beat the cream and coffee together on medium-high speed until soft peaks form. This usually takes 3–5 minutes with a mixer or 8–10 minutes by hand. You’re aiming for a thick, fluffy consistency where the cream holds its shape but isn’t overly stiff.
Pro Tip: If you prefer a subtler coffee flavor, start with 2 tablespoons of instant coffee and taste the mixture before adding more. For an extra bold kick, you can dissolve the coffee granules in a teaspoon of warm water to create a paste before adding them to the cream—this ensures even distribution.
Step 3: Sweeten the Deal
Once your coffee-infused cream is whipped to perfection, it’s time to add the sweetened condensed milk. Drizzle it into the bowl slowly, using a spatula to gently fold it into the whipped cream. Be careful not to overmix—you want to maintain the airy texture of the whipped cream while ensuring the condensed milk is fully incorporated. The mixture should look smooth, glossy, and irresistibly creamy.
Flavor Twist: For a mocha-inspired treat, stir in 2 tablespoons of cocoa powder or ¼ cup of melted chocolate at this stage. It’s a delicious way to elevate the flavor profile!
Step 4: Freeze It Up
Transfer the mixture to a freezer-safe container, such as a loaf pan or a shallow baking dish. Smooth the top with a spatula to create an even surface. Cover the container tightly with plastic wrap or an airtight lid to prevent ice crystals from forming. Pop it into the freezer and let it chill for at least 24 hours to achieve the perfect scoopable consistency.
Why 24 Hours? This extended freezing time allows the flavors to meld and the ice cream to set properly, ensuring a smooth, creamy texture without any graininess.
Step 5: Serve and Decorate
When you’re ready to indulge, remove the ice cream from the freezer and let it sit at room temperature for 5–10 minutes to soften slightly for easier scooping. Serve generous scoops in bowls or cones, and drizzle with melted chocolate for a stunning presentation. For extra pizzazz, sprinkle on crushed coffee beans, chocolate shavings, or a dusting of cocoa powder.
Serving Suggestion: Pair your coffee ice cream with a warm brownie, a slice of pound cake, or a shot of espresso for an affogato-style dessert that’s pure heaven.
Tips and Tricks for Perfect Coffee Ice Cream
To ensure your coffee ice cream is a resounding success, here are some expert tips to keep in mind:
- Keep It Cold: As mentioned, chilling your ingredients and equipment is key to achieving a light, airy whipped cream. If you’re in a warm climate, consider placing your mixing bowl in the freezer for 10 minutes before starting.
- Choose Quality Coffee: The flavor of your ice cream depends heavily on the instant coffee you use. Opt for a high-quality brand with a robust flavor profile. Alternatively, you can experiment with espresso powder for a more intense coffee kick.
- Avoid Ice Crystals: To prevent a grainy texture, make sure your container is tightly sealed during freezing. You can also press a layer of parchment paper directly onto the surface of the ice cream before covering it to minimize air exposure.
- Soften Before Serving: If the ice cream feels too hard after freezing, let it sit at room temperature for a few minutes or microwave the container (if it’s microwave-safe) for 10–15 seconds to make scooping easier.
- Make It Your Own: This recipe is endlessly customizable. Try swirling in caramel sauce, folding in crushed cookies, or adding a pinch of sea salt for a salted coffee variation.
Storage and Shelf Life
Store your coffee ice cream in the freezer, tightly covered, for up to 2 weeks for the best flavor and texture. Beyond that, it may start to develop ice crystals or lose its creamy consistency. If you’re making a big batch, consider dividing it into smaller containers so you can enjoy it fresh over multiple sittings.
Variations to Try
Feeling adventurous? Here are a few ways to put a spin on this classic coffee ice cream recipe:
- Mocha Madness: Add ¼ cup of melted dark chocolate or 2 tablespoons of cocoa powder to the mixture for a chocolatey twist.
- Caramel Coffee Crunch: Swirl in ½ cup of caramel sauce and fold in ½ cup of toffee bits or crushed biscotti for added texture.
- Spiced Coffee Delight: Incorporate ½ teaspoon of ground cinnamon or a pinch of cardamom for a warm, aromatic flavor.
- Boozy Coffee Treat: Stir in 2 tablespoons of coffee liqueur or Irish cream for an adults-only dessert (note that alcohol may slightly affect the freezing texture).
Why Make Your Own Ice Cream?
There’s something incredibly satisfying about crafting your own ice cream at home. Not only do you get to control the ingredients and customize the flavors, but you also avoid the preservatives and artificial additives often found in store-bought versions. Plus, this no-churn method is accessible to everyone—no fancy equipment required! Whether you’re a seasoned home cook or a beginner, this coffee ice cream is a fun and rewarding project that delivers professional-quality results.
A Dessert Worth Sharing
This coffee ice cream is more than just a dessert—it’s a conversation starter, a mood-lifter, and a testament to the magic of simple ingredients coming together. Serve it at your next gathering, share it with loved ones, or savor it solo with a good book and a cozy blanket. However you enjoy it, this creamy, coffee-infused treat is sure to leave you smiling.
Ready to whip up a batch? Grab your ingredients, channel your inner barista, and let’s make some ice cream magic! Share your creations with us in the comments below or tag us on social media—we’d love to see how you decorate your scoops!