Espresso-Infused Biscuit and Cream Cheese Cake: A Decadent Layered Delight 🍰☕
Imagine a dessert that combines the crisp elegance of espresso-soaked biscuits, the silky richness of cream cheese, and a glossy chocolate topping that melts in your mouth. This Espresso-Infused Biscuit and Cream Cheese Cake is a showstopper, perfect for coffee lovers and dessert enthusiasts alike. Inspired by classic layered cakes, this no-bake treat layers Petit-Beurre biscuits soaked in bold espresso with a luscious cream cheese filling, all crowned with a velvety chocolate ganache. I’ve made this for holiday gatherings, and it’s always the first to vanish! Below, I’ll guide you through every step, share tips for a flawless finish, and offer variations to make it your own. Let’s create this irresistible treat together!
Why This Recipe Is a Must-Try
This cake is a dream for those who love the marriage of coffee and chocolate, with the creamy texture of cream cheese adding a tangy balance. It’s no-bake, making it perfect for warm days or when you want a stunning dessert without turning on the oven. The layers of espresso-infused biscuits and rich filling create a texture that’s both crunchy and creamy, while the chocolate topping adds a luxurious touch. Ready to indulge? Let’s get started!
Ingredients (Serves 8–10)
For the Biscuit Layers:
- 500 grams Petit-Beurre biscuits (about 2 sleeves, or substitute with graham crackers or digestive biscuits)
- 1 cup strong brewed espresso (cooled, or 1 cup hot water mixed with 2 tablespoons instant espresso powder)
- 2 tablespoons coffee liqueur (optional, like Kahlua, for extra depth)
For the Cream Cheese Filling:
- 250 grams cream cheese (15% fat, softened to room temperature)
- 500 milliliters whipping cream (38% fat, chilled)
- ½ cup powdered sugar (adjust to taste)
- 1 teaspoon vanilla extract
- 1 tablespoon lemon juice (for a subtle tang)
For the Chocolate Ganache Topping:
- 200 grams dark chocolate (70% cocoa, chopped)
- ¾ cup heavy cream
- 1 tablespoon unsalted butter (for gloss)
For Garnish (Optional):
- Cocoa powder or chocolate shavings
- Fresh berries (like raspberries or strawberries)
- Whipped cream rosettes
Equipment Needed
- Rectangular or square dish (9×9-inch or 8×11-inch, about 2-quart capacity)
- Mixing bowls
- Electric mixer or whisk
- Spatula
- Shallow dish for soaking biscuits
- Small saucepan
- Measuring cups and spoons
- Knife or offset spatula for spreading
Instructions
- Prepare the Espresso Soak
Brew 1 cup of strong espresso and let it cool to room temperature, or mix 1 cup hot water with 2 tablespoons instant espresso powder and let it cool. For an adult twist, stir in 2 tablespoons of coffee liqueur. Pour the mixture into a shallow dish, ready for dipping the biscuits. This espresso soak is the heart of the flavor, infusing each layer with coffee goodness. - Make the Cream Cheese Filling
In a large mixing bowl, beat the softened cream cheese with an electric mixer until smooth and creamy, about 1–2 minutes. Add the powdered sugar, vanilla extract, and lemon juice, beating until fully incorporated. In a separate chilled bowl, whip the cold whipping cream until stiff peaks form (about 2–3 minutes). Gently fold the whipped cream into the cream cheese mixture with a spatula until smooth and airy. This filling should be light yet sturdy enough to hold the layers. - Assemble the Cake
Dip each Petit-Beurre biscuit briefly into the espresso mixture (about 2–3 seconds per side—don’t oversoak, or they’ll become mushy). Lay a single layer of soaked biscuits in the bottom of your dish, trimming as needed to fit. Spread a generous 1-cup layer of the cream cheese filling over the biscuits, smoothing with a spatula. Repeat with another layer of soaked biscuits and filling, continuing until you’ve used all the biscuits (usually 3–4 layers), finishing with a layer of filling on top. Cover and refrigerate for at least 4 hours, or overnight, to set and meld the flavors. - Prepare the Chocolate Ganache
In a small saucepan, heat the heavy cream over medium heat until it just begins to simmer (don’t boil). Remove from heat and add the chopped dark chocolate, letting it sit for 1 minute to melt. Stir until smooth, then add the butter, mixing until glossy. Let the ganache cool slightly (about 5 minutes) so it thickens but remains pourable. - Top and Decorate
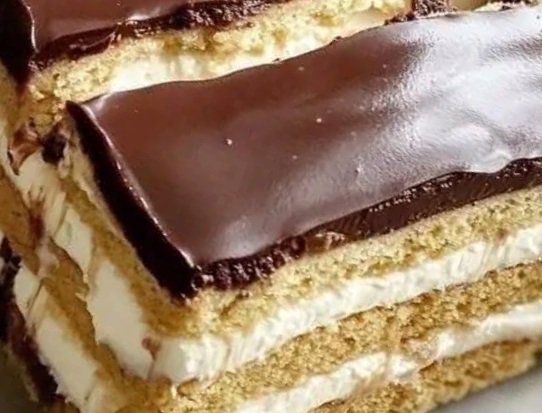
Pour the ganache over the chilled cake, spreading it evenly with a spatula to cover the top. Let it drip slightly over the edges for a dramatic effect, as seen in the image. Return the cake to the fridge for 30 minutes to set the ganache. Before serving, dust with cocoa powder or chocolate shavings, and add fresh berries or whipped cream rosettes for a pop of color and elegance. - Slice and Serve
Use a sharp knife to cut the cake into squares or rectangles, wiping the blade between cuts for clean edges. Serve chilled, savoring the contrast of crunchy biscuits, creamy filling, and rich chocolate. This cake is perfect for sharing at gatherings or enjoying with a cup of coffee!
Prep and Timing
- Prep Time: 20 minutes
- Chill Time: 4–5 hours (or overnight for best results)
- Total Time: 4 hours 20 minutes–overnight
- Servings: 8–10
- Calories: Approximately 400–450 kcal per serving (varies based on portion size)
Serving Suggestions
This cake shines as a centerpiece for any occasion:
- With Coffee: Pair with a strong espresso or latte to echo the biscuit soak.
- At Parties: Serve on a dessert platter with fresh fruit and a variety of teas.
- For Holidays: Add to a festive spread with cookies or pastries.
- Presentation: Slice and arrange on a glass dish to showcase the layers, as in the image, with chocolate shards for drama.
Tips for Cake Success
- Don’t Oversoak Biscuits: Dip quickly to keep them firm—too long, and they’ll disintegrate.
- Chill the Cream: Cold whipping cream whips faster and holds better; chill the bowl and beaters too for extra stability.
- Smooth Ganache: If the ganache sets too fast, warm it slightly and stir before pouring.
- Make Ahead: This cake tastes even better the next day as the flavors meld.
- Substitute Biscuits: If Petit-Beurre isn’t available, graham crackers or ladyfingers work well.
Creative Variations
- Mocha Twist: Add 1 tablespoon cocoa powder to the cream cheese filling for a chocolatey layer.
- Nutty Crunch: Sprinkle chopped hazelnuts or almonds between layers for texture.
- Fruit Infusion: Swirl in raspberry jam or fresh berries into the filling for a fruity contrast.
- Gluten-Free: Use gluten-free biscuits and check that your cream cheese and chocolate are gluten-free.
- White Chocolate Top: Swap dark chocolate ganache for white chocolate for a lighter finish.
Storage and Make-Ahead
- Refrigerate: Store in an airtight container in the fridge for up to 5 days. The flavors deepen over time.
- Freeze: Freeze individual slices on a baking sheet, then wrap in plastic and foil for up to 1 month. Thaw in the fridge overnight before serving.
- Make-Ahead: Assemble 1–2 days ahead, add ganache before serving, and keep chilled.
Why This Recipe Shines
The espresso-soaked biscuits absorb the coffee flavor while retaining a slight crunch, paired with a creamy, tangy filling that balances the rich chocolate ganache. This no-bake dessert is elegant yet simple, making it ideal for impressing guests or treating yourself. The visual layers, as seen in the image, add to its appeal, turning every slice into a work of art.
A Personal Story
I first tried a version of this cake at a friend’s coffee-themed party, and I was hooked! I’ve since adapted it with my own espresso-soak twist, and it’s become my go-to for special occasions. My family loves the creamy layers, and I love sneaking in a slice with my morning coffee. It’s a labor of love that always brings smiles—share your own cake creations or flavor ideas in the comments on my website!