Decadent No-Bake Butterfinger Pie: A Creamy, Crunchy Dessert Delight
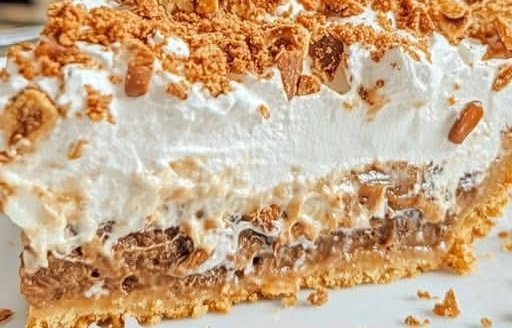
If you’re craving a dessert that combines rich peanut butter flavor with the irresistible crunch of Butterfinger candy bars, this No-Bake Butterfinger Pie is your answer. Perfect for potlucks, family gatherings, or a sweet indulgence at home, this pie is a crowd-pleaser that comes together effortlessly. With a velvety cream cheese filling, a buttery graham cracker crust, and a generous topping of crushed Butterfinger candy, every bite is a heavenly blend of creamy and crunchy textures. Best of all, it requires no oven time, making it an ideal treat for warm days or when you’re short on time.
In this detailed guide, we’ll walk you through the step-by-step process of creating this indulgent pie, share tips for perfect results, suggest creative variations, and provide serving ideas to make your dessert stand out. Whether you’re a novice baker or a seasoned dessert enthusiast, this recipe is simple, versatile, and guaranteed to satisfy your sweet tooth.
Ingredients for Butterfinger Pie
To make this luscious no-bake pie, you’ll need the following ingredients. These are easy to find at any grocery store, and you can customize them based on your preferences or dietary needs (see variations below).
- 1 (8 oz) block of cream cheese, softened to room temperature
- 1 (8 oz) tub of whipped topping (such as Cool Whip), thawed
- 1 cup confectioners’ sugar (also known as powdered sugar)
- 1/2 cup smooth peanut butter (use a creamy, not crunchy, variety for a silky texture)
- 3 full-size Butterfinger candy bars (approximately 2.1 oz each), crushed into small pieces
- 1 (9-inch) pre-made graham cracker crust (store-bought or homemade)
- 1 teaspoon pure vanilla extract (for a hint of warmth and depth)
- Optional: A pinch of salt (to enhance the flavors, especially if using unsalted peanut butter)
Yield: This recipe makes one 9-inch pie, serving 8-10 slices, depending on how generously you cut it.
Equipment Needed
- Large mixing bowl
- Electric hand mixer or stand mixer (a whisk and elbow grease work too, but it’ll take longer)
- Rubber spatula
- Measuring cups and spoons
- Food processor or resealable plastic bag and rolling pin (for crushing Butterfinger bars)
- Refrigerator (for chilling the pie)
Step-by-Step Instructions
Follow these simple steps to create a show-stopping Butterfinger Pie that’s as beautiful as it is delicious. The process is straightforward, and the result is a dessert that looks like it took hours to make.
- Prepare the Cream Cheese Base
In a large mixing bowl, combine the softened cream cheese and confectioners’ sugar. Using an electric hand mixer on medium speed, beat the mixture until it’s smooth and creamy, about 2-3 minutes. Scrape down the sides of the bowl with a spatula to ensure everything is well incorporated. The goal is a lump-free, velvety texture that will form the foundation of the pie’s rich filling. - Incorporate the Peanut Butter and Vanilla
Add the creamy peanut butter, vanilla extract, and a pinch of salt (if using) to the cream cheese mixture. Beat on medium speed for another 1-2 minutes until fully combined. The mixture should be thick, smooth, and slightly glossy, with a pronounced peanut butter flavor. Taste a small amount (if safe to do so) to ensure the balance of sweetness and nuttiness is to your liking. - Fold in the Whipped Topping
Gently fold in the thawed whipped topping using a rubber spatula. This step is crucial for achieving the pie’s light, airy texture. Use a slow, deliberate folding motion to combine the ingredients without deflating the whipped topping. Continue folding until the mixture is uniform and fluffy, with no streaks of whipped topping remaining. - Add the Butterfinger Crunch
Reserve about one-third of the crushed Butterfinger pieces (approximately one candy bar’s worth) for garnishing the top of the pie. Fold the remaining crushed Butterfinger pieces into the filling mixture. The candy adds delightful bursts of chocolatey, peanut buttery crunch that make this pie so addictive. Stir gently to distribute the pieces evenly without breaking them down too much. - Fill the Graham Cracker Crust
Spoon the filling into the pre-made graham cracker crust, spreading it evenly with a spatula. Smooth the top for a polished look, or create soft swirls for a more rustic appearance. The buttery, slightly sweet crust complements the creamy filling perfectly, providing a sturdy base that holds everything together. - Garnish with Butterfinger Topping
Sprinkle the reserved crushed Butterfinger pieces over the top of the pie. This not only adds extra crunch but also makes the pie visually appealing, signaling the deliciousness within. For an extra touch, you can add a drizzle of melted chocolate or a few whole Butterfinger pieces as a garnish (see variations below). - Chill the Pie
Cover the pie loosely with plastic wrap or the lid provided with the store-bought crust. Refrigerate for at least 4 hours, though overnight chilling (8-12 hours) is ideal for the best texture and flavor. Chilling allows the filling to set properly, making it easier to slice and serve. - Serve and Enjoy
When ready to serve, use a sharp knife to cut the pie into wedges. For clean slices, dip the knife in warm water and wipe it dry between cuts. Serve chilled, and watch your guests’ eyes light up as they take their first bite of this creamy, crunchy masterpiece.
Tips for Perfect Butterfinger Pie
- Soften the Cream Cheese Properly: To avoid lumps, let the cream cheese sit at room temperature for about 30-60 minutes before mixing. If you’re in a hurry, cut it into smaller pieces and microwave it in 10-second bursts until just soft (not melted).
- Crush Butterfingers Efficiently: Place the candy bars in a resealable plastic bag and use a rolling pin to crush them into small, bite-sized pieces. Alternatively, pulse them in a food processor for a finer texture, but avoid turning them into powder.
- Thaw the Whipped Topping: Ensure the whipped topping is fully thawed in the refrigerator before use. This makes it easier to fold into the filling and prevents a grainy texture.
- Customize the Crust: While a graham cracker crust is classic, you can experiment with chocolate cookie crusts, shortbread crusts, or even a homemade crust for a personal touch.
- Make It Ahead: This pie is perfect for preparing a day in advance, as the flavors meld beautifully during chilling. It’s a great option for stress-free entertaining.
Variations to Try
One of the best things about this Butterfinger Pie is its versatility. Here are some creative twists to make it your own:
- Chocolate Lover’s Version: Add 1/4 cup of melted semi-sweet chocolate or chocolate ganache to the filling for a richer flavor. You can also drizzle melted chocolate over the top before adding the Butterfinger garnish.
- Peanut Butter Cup Pie: Swap out one Butterfinger bar for chopped peanut butter cups to double down on the peanut butter goodness.
- Salted Caramel Twist: Drizzle store-bought or homemade salted caramel sauce over the top of the pie for a sweet-salty contrast.
- Oreo Crust Option: Replace the graham cracker crust with a chocolate Oreo crust for a more decadent base.
- Lightened-Up Version: Use reduced-fat cream cheese and light whipped topping to cut calories without sacrificing flavor. You can also opt for a natural peanut butter with no added sugar.
- Mini Pies: Instead of one large pie, divide the filling among individual graham cracker crusts or mason jars for cute, single-serve desserts.
Serving Suggestions
This Butterfinger Pie is a star on its own, but you can elevate the experience with these serving ideas:
- Pair with Beverages: Serve with a glass of cold milk, hot coffee, or a dessert wine like Moscato to complement the pie’s sweetness.
- Add a Dollop of Whipped Cream: For extra decadence, top each slice with a swirl of fresh whipped cream before sprinkling on the Butterfinger pieces.
- Garnish with Fruit: Add a few fresh raspberries or sliced strawberries on the side for a pop of color and a touch of tartness.
- Holiday Flair: For festive occasions, sprinkle edible gold dust or holiday-themed sprinkles over the top to match the season.
Storage and Make-Ahead Instructions
- Refrigerator: Store leftover pie in the refrigerator, covered tightly with plastic wrap or in an airtight container, for up to 4 days. The crust may soften slightly over time, but the flavors will remain delicious.
- Freezer: To freeze, wrap the entire pie (or individual slices) tightly in plastic wrap and then aluminum foil. Freeze for up to 1 month. Thaw in the refrigerator overnight before serving. Note that the texture may be slightly less creamy after freezing.
- Make-Ahead: Prepare the pie up to 2 days in advance and store it in the refrigerator until ready to serve. Add the Butterfinger topping just before serving to maintain maximum crunch.
Why You’ll Love This Butterfinger Pie
This no-bake Butterfinger Pie is the ultimate dessert for peanut butter and candy lovers. Its creamy filling, crunchy candy bits, and buttery crust create a perfect harmony of textures and flavors. Plus, it’s incredibly easy to make, requiring just a handful of ingredients and minimal effort. Whether you’re hosting a party, celebrating a special occasion, or simply treating yourself, this pie is sure to impress.
The no-bake aspect makes it a fantastic choice for beginners or anyone looking to save time in the kitchen. And with endless possibilities for customization, you can adapt the recipe to suit your taste or dietary preferences. It’s a dessert that delivers big on flavor and wow factor without the fuss.