Crispy Buttermilk Fried Chicken Tenders
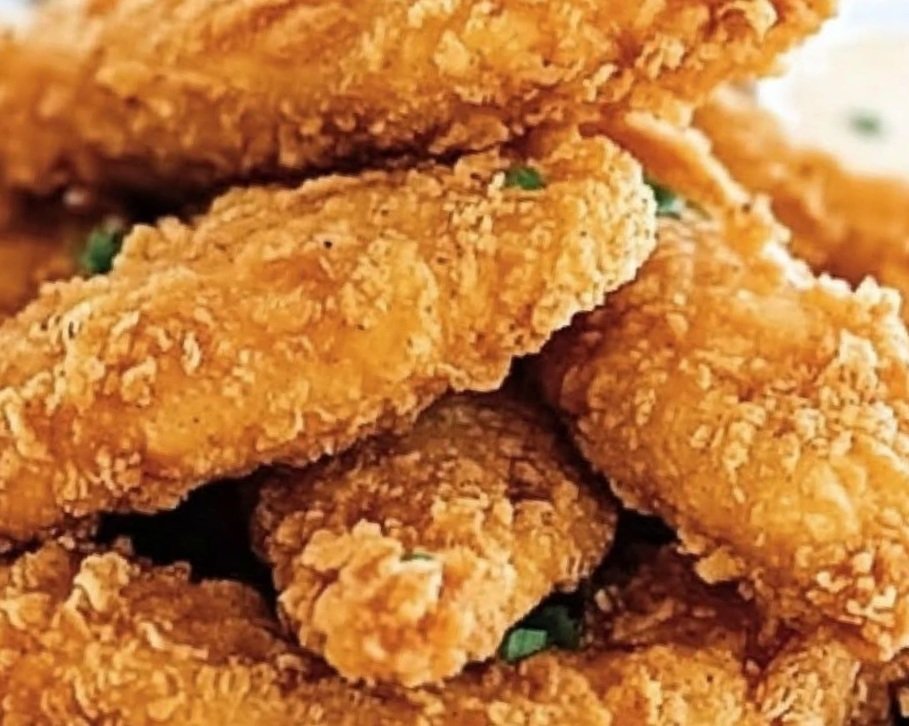
Nothing says comfort food quite like golden, crispy fried chicken tenders, bursting with juicy flavor and a satisfying crunch. This recipe for buttermilk-marinated chicken tenders delivers a delightful balance of tangy, savory, and perfectly seasoned goodness. By soaking the chicken in a buttermilk marinade infused with spices, you’ll achieve tender, flavorful meat encased in a crispy, golden coating. Whether you’re preparing a family dinner, a game-day snack, or a crowd-pleasing appetizer, these tenders are sure to impress. Follow this step-by-step guide to create a dish that’s as delicious as it is versatile, paired with your favorite dipping sauces or served alongside classic sides.
Ingredients
- 1 pound chicken tenderloins (or boneless, skinless chicken breasts cut into strips)
- 1 cup buttermilk (full-fat for maximum richness, or low-fat if preferred)
- 1 1/4 teaspoons sea salt (divided, for marinade and seasoning)
- 3/4 teaspoon freshly ground black pepper (divided, for marinade and coating)
- 1 1/2 teaspoons garlic powder (divided, for depth of flavor)
- 1 teaspoon onion powder (for a savory, aromatic kick)
- 1 1/4 teaspoons smoked paprika (divided, for a subtle smoky warmth)
- 1 1/2 cups all-purpose flour (or gluten-free flour for dietary needs)
- 1 teaspoon baking powder (optional, for extra crispiness)
- Vegetable oil (or canola oil, for frying; enough to fill a skillet about 1 inch deep)
- Optional add-ins for marinade: 1 teaspoon hot sauce, 1/2 teaspoon cayenne pepper, or 1 tablespoon fresh chopped herbs (like parsley or thyme) for extra zing
Equipment Needed
- Large mixing bowl
- Shallow dish or plate for dredging
- Large, heavy-bottomed skillet or Dutch oven
- Tongs or slotted spoon
- Thermometer (optional, for checking oil temperature)
- Wire rack or paper towel-lined plate for draining
Instructions
- Prepare the Buttermilk Marinade: In a large mixing bowl, whisk together 1 cup of buttermilk, 1 teaspoon sea salt, 1/2 teaspoon black pepper, 1 teaspoon garlic powder, 1 teaspoon onion powder, and 1 teaspoon smoked paprika. For an extra layer of flavor, consider adding a splash of hot sauce or a pinch of cayenne pepper if you like a bit of heat. Add the chicken tenderloins to the bowl, ensuring each piece is fully submerged in the marinade. Cover the bowl with plastic wrap or a lid and refrigerate for at least 1 hour, or ideally overnight (8–12 hours) for the most tender and flavorful results. The buttermilk works its magic by tenderizing the chicken while infusing it with rich, tangy flavors.
- Set Up the Dredging Station: In a shallow dish, combine 1 1/2 cups all-purpose flour, 1/4 teaspoon sea salt, 1/4 teaspoon black pepper, 1/2 teaspoon garlic powder, and 1/4 teaspoon smoked paprika. For an extra-crispy coating, add 1 teaspoon of baking powder to the flour mixture—this helps create a lighter, airier crust. Mix thoroughly to ensure the seasonings are evenly distributed.
- Coat the Chicken: Remove the chicken tenders from the refrigerator. Working with one tender at a time, lift it from the buttermilk marinade, allowing excess liquid to drip off. Gently place the tender in the flour mixture, pressing lightly to coat all sides. Shake off any excess flour to ensure a thin, even coating—this prevents a heavy, doughy crust. Place the coated tenders on a plate or wire rack and let them rest for 5–10 minutes. This brief rest helps the coating adhere better during frying.
- Heat the Oil: Pour vegetable oil into a large, heavy-bottomed skillet or Dutch oven until it reaches a depth of about 1 inch. Heat the oil over medium-high heat until it reaches 350°F (175°C). If you don’t have a thermometer, test the oil by sprinkling a pinch of flour into it; it should sizzle immediately but not burn. Proper oil temperature is key to achieving crispy, evenly cooked tenders without greasiness.
- Fry the Tenders: Carefully add the coated chicken tenders to the hot oil, working in small batches to avoid overcrowding the pan (this prevents the oil temperature from dropping). Fry each tender for 4–6 minutes per side, turning once, until the coating is a deep golden brown and the internal temperature of the chicken reaches 165°F (75°C). Use tongs to turn the tenders gently to maintain the crispy coating. If the tenders brown too quickly, lower the heat slightly to ensure the chicken cooks through without burning.
- Drain and Rest: Using a slotted spoon or tongs, transfer the fried chicken tenders to a wire rack set over a baking sheet or a plate lined with paper towels to drain excess oil. Allow the tenders to rest for 2–3 minutes; this helps retain their crispiness and allows the juices to settle.
- Serve and Enjoy: Arrange the hot, crispy chicken tenders on a serving platter and pair them with your favorite dipping sauces—think classic honey mustard, creamy ranch, tangy barbecue, or a spicy sriracha mayo. Garnish with a sprinkle of fresh parsley or chopped green onions for a pop of color and flavor. Serve immediately for the best texture and taste.
Prep Time: 1 hour (plus optional overnight marinating)
Cooking Time: 12–15 minutes
Total Time: 1 hour 15 minutes (plus marinating time)
Servings: 4–6 servings
Tips for Success
- Marinate Longer for Maximum Flavor: While 1 hour works, marinating overnight allows the buttermilk and spices to penetrate deeper, resulting in juicier, more flavorful chicken.
- Double-Dredge for Extra Crunch: For an even thicker, crunchier coating, dip the tenders back into the buttermilk after the first flour coating, then dredge in flour again before frying.
- Keep the Oil Temperature Steady: Use a thermometer to maintain the oil at 350°F. Too low, and the tenders will absorb oil and become greasy; too high, and the coating may burn before the chicken is cooked.
- Make It Your Own: Experiment with additional spices in the marinade or flour, such as cayenne for heat, dried thyme for an herby note, or chili powder for a smoky kick.
Serving Suggestions
These buttermilk fried chicken tenders are incredibly versatile. Serve them as a main dish with classic sides like creamy mashed potatoes, coleslaw, or buttery cornbread. For a lighter option, pair them with a crisp green salad or roasted vegetables. They also make fantastic appetizers for parties—arrange them on a platter with an assortment of dipping sauces to please every palate. For a fun twist, use the tenders in sliders, topped with pickles and a drizzle of sauce on soft buns, or chop them up for a hearty chicken salad.
Variations
- Spicy Tenders: Add 1–2 teaspoons of hot sauce or 1/2 teaspoon of cayenne pepper to the buttermilk marinade, and include a pinch of chili powder in the flour mixture.
- Gluten-Free Option: Swap the all-purpose flour for a gluten-free flour blend or cornstarch for a crispy, gluten-free coating.
- Baked Tenders: For a healthier version, preheat the oven to 425°F (220°C). Place the coated tenders on a wire rack set over a baking sheet, spray lightly with cooking spray, and bake for 20–25 minutes, flipping halfway, until golden and cooked through.
- Herb-Infused Tenders: Add 1 tablespoon of fresh chopped herbs like rosemary, thyme, or dill to the buttermilk marinade for a fresh, aromatic flavor.
Storage and Reheating
- Refrigeration: Store leftover tenders in an airtight container in the refrigerator for up to 3 days.
- Freezing: Freeze cooked tenders on a baking sheet until solid, then transfer to a freezer-safe bag for up to 2 months. Thaw in the refrigerator before reheating.
- Reheating: Reheat in a 375°F (190°C) oven for 10–12 minutes to restore crispiness, or use an air fryer at 360°F (180°C) for 5–7 minutes. Avoid microwaving, as it can make the coating soggy.
Why You’ll Love This Recipe
These buttermilk fried chicken tenders are the ultimate crowd-pleaser, combining a crispy exterior with tender, juicy meat. The buttermilk marinade ensures every bite is packed with flavor, while the seasoned flour coating delivers that perfect crunch. Whether you’re cooking for a family meal, a casual gathering, or just craving a comforting treat, this recipe is easy to follow and endlessly adaptable. Plus, it’s a great way to elevate simple ingredients into something truly special.