Chi-Chi’s-Inspired Baked Chicken Chimichangas: Crispy, Cheesy, and Oh-So-Delicious
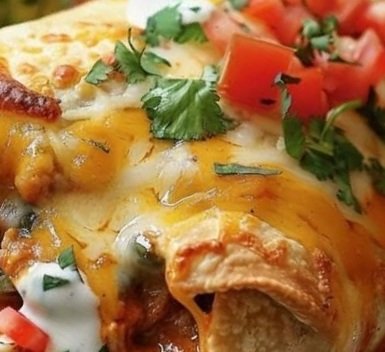
If you’re craving a taste of Tex-Mex nostalgia, these Baked Chicken Chimichangas, inspired by the beloved Chi-Chi’s restaurant chain, are about to become your new go-to dinner. Packed with tender shredded chicken, melty Monterey Jack and cheddar cheeses, zesty salsa, and a kick of green chilies, these chimichangas are wrapped in flour tortillas and baked to golden perfection. Forget deep-frying—these oven-baked beauties are crispy, healthier, and bursting with flavor. Whether you’re hosting a family taco night or meal-prepping for the week, this recipe is easy, customizable, and guaranteed to satisfy. Let’s roll up our sleeves and bring a little Chi-Chi’s magic to your kitchen!
What Makes These Chimichangas Special?
- Nostalgic Vibes: Reminiscent of Chi-Chi’s classic Tex-Mex dishes, this recipe brings the restaurant experience home.
- Healthier Twist: Baking instead of frying cuts down on oil without skimping on crunch.
- Bold Flavors: A spice blend of cumin, chili powder, and optional cayenne delivers a Southwestern punch.
- Versatile: Perfect for using leftover chicken and adaptable with your favorite add-ins.
Ingredients for Baked Chicken Chimichangas
This recipe serves 6 and uses simple ingredients to create a fiesta of flavors. Here’s what you’ll need:
- 2 cups cooked shredded chicken (rotisserie chicken or leftover grilled chicken works perfectly)
- 1 cup shredded Monterey Jack cheese (for creamy, melty goodness)
- 1 cup shredded cheddar cheese (for sharp, tangy flavor)
- 1/2 cup salsa (choose your favorite—mild, medium, or spicy)
- 1/4 cup diced green chilies (canned or fresh, for a mild heat)
- 1 teaspoon ground cumin (for warm, earthy notes)
- 1 teaspoon chili powder (for a smoky kick)
- 1/2 teaspoon garlic powder (for savory depth)
- 1/4 teaspoon cayenne pepper (optional, for those who like it spicy)
- Salt and black pepper, to taste (about 1/4 teaspoon each)
- 6 large flour tortillas (10-inch size, soft and pliable)
- Cooking spray or olive oil spray (for crisping the tortillas)
- For serving: Sour cream, guacamole, and extra salsa (because dipping is half the fun!)
Optional Add-Ins
- 1/2 cup black beans, drained and rinsed (for heartiness)
- 1/2 cup corn kernels (for sweet crunch)
- 1/4 cup diced red bell pepper (for color and freshness)
- Fresh cilantro, chopped (for a bright, herby finish)
Equipment Needed
- Large mixing bowl
- Baking sheet
- Parchment paper or silicone baking mat
- Measuring cups and spoons
- Spoon or spatula for mixing
- Pastry brush (optional, for oil)
- Knife or kitchen scissors (for trimming tortillas, if needed)
Step-by-Step Instructions
These chimichangas are a breeze to assemble and bake, delivering crispy, cheesy perfection in under 45 minutes. Follow these steps for a Tex-Mex triumph.
Step 1: Preheat and Prepare
- Preheat your oven to 400°F (200°C).
- Line a baking sheet with parchment paper or a silicone baking mat to prevent sticking and make cleanup a snap.
Step 2: Mix the Filling
- In a large mixing bowl, combine the 2 cups shredded chicken, 1 cup Monterey Jack cheese, 1 cup cheddar cheese, 1/2 cup salsa, 1/4 cup diced green chilies, 1 teaspoon cumin, 1 teaspoon chili powder, 1/2 teaspoon garlic powder, and 1/4 teaspoon cayenne pepper (if using).
- Season with salt and black pepper to taste. Stir until the mixture is well combined, ensuring the spices and salsa evenly coat the chicken and cheese.
- (Optional) Fold in black beans, corn, or diced bell peppers for extra texture and flavor.
Step 3: Assemble the Chimichangas
- Warm the 6 flour tortillas in the microwave for 15–20 seconds to make them soft and pliable, preventing cracks during rolling.
- Place about 1/3 cup of the chicken filling in the center of each tortilla, spreading it into a slight rectangle shape.
- Fold the left and right sides of the tortilla over the filling, then fold the bottom edge up and roll tightly to form a burrito-like shape. Ensure the seam is on the bottom to keep it secure.
Step 4: Prep for Baking
- Arrange the chimichangas seam-side down on the prepared baking sheet, leaving a little space between each one.
- Lightly mist the tops and sides with cooking spray or brush with a thin layer of olive oil. This helps achieve that golden, crispy exterior.
Step 5: Bake to Crispy Perfection
- Bake in the preheated oven for 20–25 minutes, or until the tortillas are golden brown and crisp to the touch.
- For extra crunch, flip the chimichangas halfway through baking, though this is optional.
- Remove from the oven and let them cool for 3–5 minutes to set the filling and make them easier to handle.
Step 6: Serve and Enjoy
- Transfer the chimichangas to a serving platter or individual plates.
- Serve hot with dollops of sour cream, guacamole, and a side of salsa for dipping. Garnish with chopped cilantro or a sprinkle of extra cheese for a festive touch.
Serving Suggestions
These Baked Chicken Chimichangas are a meal on their own, but pairing them with complementary sides elevates the experience. Try these ideas:
- Mexican Rice: A fluffy side of rice seasoned with tomato and spices.
- Refried Beans: Creamy and savory, perfect for scooping or spreading.
- Southwest Salad: Toss lettuce, avocado, corn, and tomatoes with a lime-cilantro dressing.
- Chips and Dip: Serve with queso or a fresh pico de gallo for extra Tex-Mex flair.
- Drinks: Pair with a refreshing margarita, agua fresca, or ice-cold Mexican soda.
Tips for Perfect Chimichangas
- Prevent Soggy Tortillas: Don’t overfill the tortillas, and ensure the filling isn’t too wet. Drain excess liquid from the salsa or chilies if needed.
- Crispier Results: After spraying with cooking spray, sprinkle a pinch of coarse salt or extra chili powder on top for added flavor and texture.
- Use Fresh Tortillas: Older tortillas may crack when rolled. If they’re stiff, warm them longer or steam them briefly.
- Check Doneness: The chimichangas are ready when the tortillas are golden and slightly firm. If they’re browning too quickly, cover loosely with foil.
Variations to Spice Things Up
- Spicy Chipotle: Swap the salsa for chipotle salsa or add a teaspoon of adobo sauce for smoky heat.
- Veggie-Packed: Include sautéed onions, zucchini, or mushrooms for a heartier filling.
- Breakfast Chimichangas: Add scrambled eggs and bacon to the filling for a brunch twist.
- Cheese Swap: Use pepper jack for a spicy kick or queso fresco for a milder, crumbly texture.
Make-Ahead and Storage Instructions
Make-Ahead
- Prepare the filling up to 2 days in advance and store in an airtight container in the refrigerator.
- Assemble the chimichangas (without baking) and wrap tightly in plastic wrap. Refrigerate for up to 24 hours, then bake as directed.
Storage
- Refrigerator: Store leftover baked chimichangas in an airtight container for up to 3 days. Reheat in a 350°F oven for 10–12 minutes to restore crispiness.
- Freezer: Freeze unbaked or baked chimichangas in a single layer on a baking sheet, then transfer to a freezer bag for up to 3 months. Bake unbaked chimichangas from frozen at 400°F for 30–35 minutes; reheat baked ones at 350°F for 15–20 minutes.
A Nod to Chi-Chi’s Legacy
Chi-Chi’s was a beloved chain that brought Tex-Mex to tables across America, known for its vibrant flavors and festive atmosphere. While the restaurants are no longer around, their spirit lives on in dishes like these chimichangas. This recipe captures the essence of their bold, cheesy, crowd-pleasing style but with a modern, baked-not-fried approach that fits today’s home kitchens. It’s a tribute to those salsa-soaked memories, reimagined for your dinner table.
Frequently Asked Questions
Can I use corn tortillas instead of flour?
Corn tortillas are smaller and less pliable, so they’re trickier for chimichangas. If you try them, warm them thoroughly and use smaller portions of filling to prevent breaking.
How do I make these gluten-free?
Use gluten-free flour tortillas and ensure your salsa and spices are gluten-free. The rest of the ingredients are naturally gluten-free.
Can I fry these instead of baking?
Yes! Heat 1/2 inch of vegetable oil in a skillet over medium heat and fry each chimichanga for 2–3 minutes per side until golden. Drain on paper towels.
What’s the best salsa to use?
Choose a thick, chunky salsa to avoid a watery filling. Restaurant-style or homemade works great, and you can adjust the spice level to your taste.
Nutritional Information (Approximate, Per Chimichanga)
- Calories: 380 kcal
- Protein: 22g
- Fat: 18g
- Carbohydrates: 30g
- Fiber: 2g
- Sugar: 2g
Note: Values vary based on ingredient brands and portion sizes.
Final Thoughts
These Chi-Chi’s-Inspired Baked Chicken Chimichangas are the perfect way to bring bold Tex-Mex flavors to your table without the hassle of frying. With a crispy tortilla shell, a cheesy, spicy chicken filling, and all your favorite toppings, they’re a guaranteed hit for family dinners, game nights, or any time you’re craving comfort food with a kick. Plus, they’re endlessly customizable, so you can make them your own. Whip up a batch, grab some salsa, and let the fiesta begin!
We’d love to hear how your chimichangas turned out! Share your tips, variations, or photos in the comments below or tag us on social media. Happy cooking!