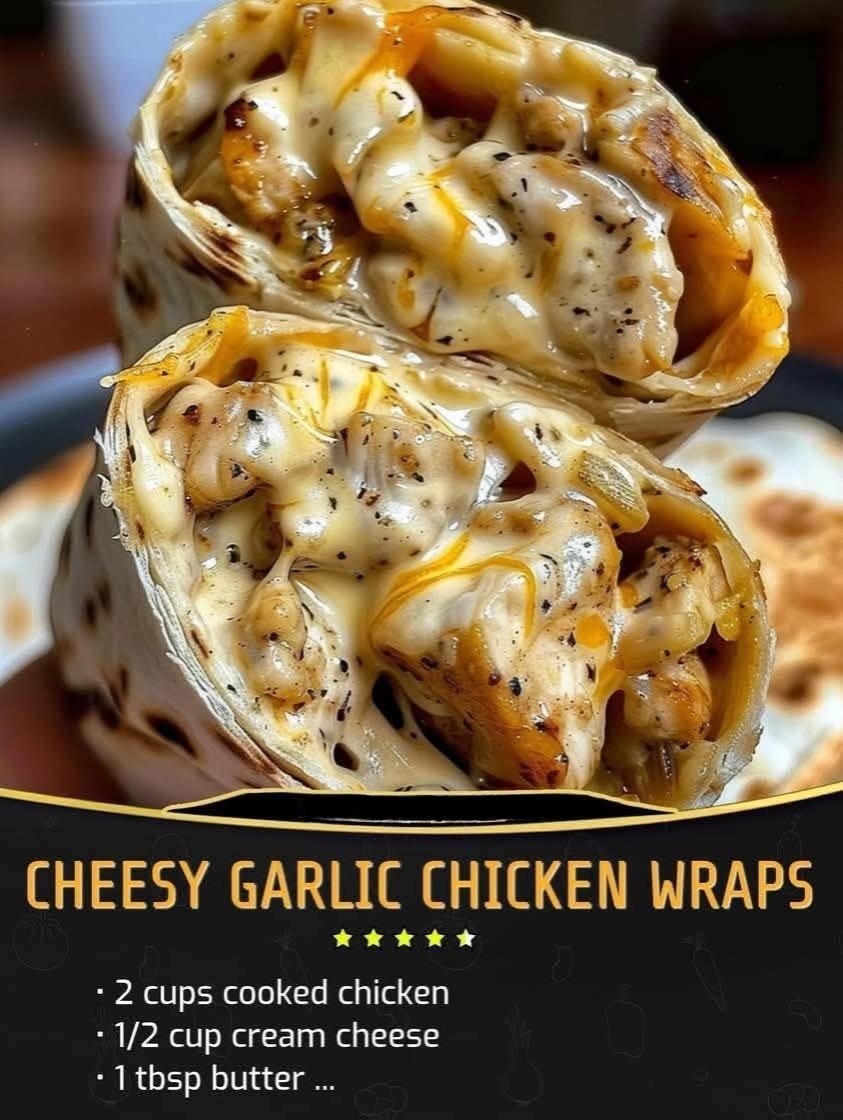
Cheesy Garlic Chicken Wraps: A Quick & Flavorful Meal
If you’re looking for a meal that’s easy to prepare, packed with flavor, and irresistibly cheesy, these Cheesy Garlic Chicken Wraps are the perfect choice! With tender shredded chicken, gooey mozzarella, and a creamy, garlicky filling, these wraps are pan-seared until golden brown for a crispy, melty delight.
Whether you’re whipping them up for lunch, dinner, or even a snack, they’re sure to become a household favorite. Plus, they’re customizable—add fresh spinach, tomatoes, or a drizzle of your favorite sauce for an extra burst of flavor.
Ingredients (Serves 4)
For the Filling:
- 2 cups cooked chicken breast, shredded (rotisserie chicken works great for convenience!)
- 1 cup shredded mozzarella cheese (or substitute with cheddar for a sharper flavor)
- 1/2 cup cream cheese, softened
- 2 cloves garlic, minced (adjust for more garlicky goodness!)
- 1/2 teaspoon Italian seasoning (a blend of oregano, basil, and thyme for a savory kick)
- Salt and black pepper, to taste
For the Wraps:
- 4 large flour tortillas (burrito-size for easy rolling)
- 1 tablespoon butter, melted (for crisping the wraps to golden perfection)
- Fresh spinach or lettuce (optional) (for a fresh crunch!)
Instructions
Step 1: Prepare the Cheesy Garlic Chicken Filling
In a large mixing bowl, combine the shredded chicken, mozzarella cheese, cream cheese, minced garlic, Italian seasoning, salt, and pepper. Mix well until everything is evenly incorporated. The cream cheese will bind the ingredients together, creating a rich and creamy texture.
Step 2: Assemble the Wraps
Lay out the flour tortillas on a clean surface. Divide the chicken mixture evenly among the tortillas, placing it in the center of each one.
If using, add a handful of fresh spinach or lettuce on top of the chicken mixture for a refreshing contrast.
Step 3: Roll the Wraps
Fold in the sides of each tortilla, then roll them up tightly like a burrito. This helps keep the filling secure while cooking.
Step 4: Brush with Butter & Toast
Using a pastry brush (or the back of a spoon), brush the outside of each wrap with melted butter. This step ensures a crispy, golden-brown finish when cooking.
Heat a large skillet over medium heat. Place the wraps seam-side down in the skillet and cook for about 2–3 minutes per side, pressing gently with a spatula, until they are golden brown and crispy.
Step 5: Serve & Enjoy!
Remove from the skillet and let them cool slightly before slicing in half. Serve warm on their own, or pair with your favorite dipping sauce like ranch, honey mustard, or garlic aioli for extra flavor!
Serving Suggestions & Variations
- Add more veggies: Try adding sliced tomatoes, bell peppers, or sautéed mushrooms for extra texture.
- Make it spicy: Mix in a pinch of red pepper flakes or a few dashes of hot sauce for a kick of heat.
- Go low-carb: Swap the flour tortillas for lettuce wraps or low-carb tortillas for a keto-friendly option.
- Try different cheeses: Swap mozzarella for pepper jack, provolone, or a smoky gouda for a flavor twist.
Storage & Meal Prep Tips
- Make ahead: You can prepare the filling in advance and store it in an airtight container in the fridge for up to 3 days. Assemble and cook the wraps when ready to eat!
- Reheating: To keep the wraps crispy, reheat in a skillet for 2–3 minutes per side or in an air fryer at 350°F (175°C) for 5 minutes.
- Freezing: Assemble the wraps (but don’t cook them), wrap them tightly in plastic wrap, and freeze. When ready to eat, thaw overnight in the fridge and cook as directed.
Why You’ll Love This Recipe
✔ Quick & Easy – Ready in under 20 minutes, perfect for busy weeknights!
✔ Cheesy & Flavorful – The creamy, garlicky chicken filling is irresistibly good.
✔ Crispy & Golden – Toasting the wraps in butter gives them the perfect crunch.
✔ Customizable – Add your favorite veggies, cheeses, or sauces to make it your own.
If you’re looking for a simple yet delicious meal that the whole family will love, these Cheesy Garlic Chicken Wraps are a must-try!
Enjoy your meal, and happy cooking!