Golden Tuna Melt Patties: A Cheesy, Crispy Comfort Food Classic 🐟🧀
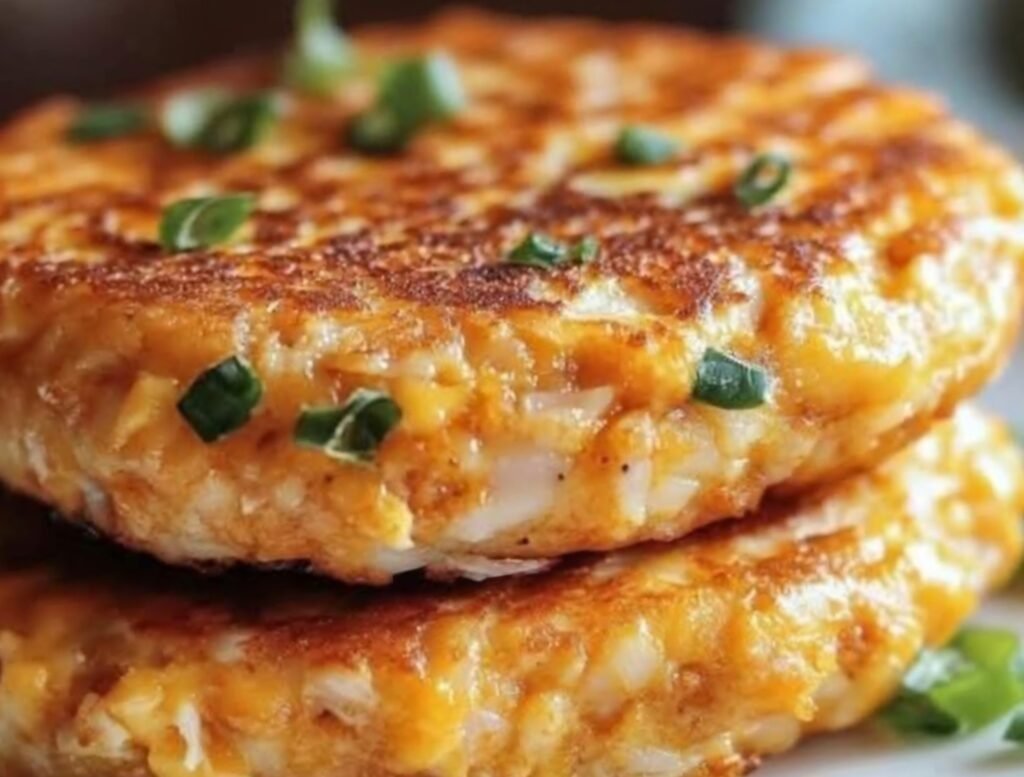
Craving a nostalgic tuna melt but want something with a bit more crunch and pizzazz? These Golden Tuna Melt Patties are the perfect solution! Combining the savory, flaky goodness of tuna with a cheesy, crispy exterior, these patties elevate the classic tuna melt into a versatile dish that’s ideal as a sandwich filling, a standalone snack, or a light meal paired with a fresh salad. With a zesty kick from Dijon mustard, a hint of lemon, and melty cheddar, this recipe is quick, budget-friendly, and packed with flavor. Let’s dive into this delightful twist on a comfort food favorite that’s sure to become a go-to in your kitchen!
Why These Tuna Melt Patties Shine
These patties are a fantastic way to transform pantry staples into something extraordinary. Here’s why you’ll fall in love with them:
- Quick Prep: Ready in under 20 minutes, perfect for busy weeknights or a last-minute lunch.
- Crispy & Cheesy: The golden crust and melty cheese make every bite irresistible.
- Budget-Friendly: Uses affordable canned tuna and simple ingredients you likely already have.
- Customizable: Serve as sliders, on salads, or solo with your favorite dipping sauce.
Ingredients (Makes 4-6 Patties)
Gather these everyday ingredients to whip up your tuna melt patties:
- 2 cans (5 oz each) tuna in water or oil, drained – Opt for solid or chunk tuna for better texture.
- ¼ cup mayonnaise – Adds creaminess and binds the mixture.
- 1 large egg, beaten – Helps hold the patties together.
- 1 tsp Dijon mustard – Brings a tangy, sophisticated flavor.
- ½ cup breadcrumbs – Panko for extra crunch or regular for a softer texture.
- ½ tsp garlic powder – Enhances savory depth.
- ½ tsp onion powder – Adds a subtle oniony warmth.
- ½ tsp salt – To balance and elevate flavors.
- ¼ tsp black pepper – For a mild kick.
- ½ cup shredded cheddar cheese – Or try Swiss, mozzarella, or pepper jack for variety.
- 2 tbsp chopped green onions or fresh parsley – For freshness and color.
- 1 tbsp fresh lemon juice – Brightens the flavors with a zesty note.
- 1 tbsp butter or neutral oil (e.g., avocado or vegetable) – For frying to golden perfection.
Optional for Serving:
- Sliced ripe tomatoes
- Extra cheese slices for melting
- Toasted buns, slider rolls, or bread slices
- Condiments like tartar sauce, spicy mayo, or ketchup
- Lettuce leaves or arugula for crunch
Equipment Needed
- Large mixing bowl
- Nonstick skillet or frying pan
- Spatula
- Measuring cups and spoons
- Plate lined with paper towels (for draining)
- Optional: baking sheet (if baking instead of frying)
Step-by-Step Instructions
Follow these simple steps to create your crispy, cheesy tuna melt patties:
- Combine the Mixture: In a large mixing bowl, flake the drained tuna with a fork until it’s finely broken up. Add ¼ cup mayonnaise, 1 beaten egg, 1 tsp Dijon mustard, ½ cup breadcrumbs, ½ tsp garlic powder, ½ tsp onion powder, ½ tsp salt, ¼ tsp black pepper, ½ cup shredded cheddar cheese, 2 tbsp chopped green onions or parsley, and 1 tbsp lemon juice. Stir gently but thoroughly until all ingredients are evenly combined. The mixture should be moist but firm enough to hold its shape. If it feels too wet, add an extra tablespoon of breadcrumbs.
- Form the Patties: Divide the mixture into 4-6 equal portions, depending on your preferred patty size (4 for larger burger-style patties, 6 for smaller sliders). Roll each portion into a ball, then flatten into a ½-inch thick patty. Press firmly to ensure they don’t crumble during cooking. Place patties on a plate and chill for 10 minutes (optional, for easier handling).
- Fry the Patties: Heat 1 tbsp butter or oil in a large nonstick skillet over medium heat until shimmering. Carefully add the patties, working in batches if needed to avoid overcrowding. Cook for 3-4 minutes per side, or until the patties are golden brown and crispy. Use a spatula to flip them gently to maintain their shape.
- Add Extra Cheese (Optional): For an extra melty tuna melt experience, place a slice of cheddar, Swiss, or your favorite cheese on each patty during the last minute of cooking. Cover the skillet with a lid to trap heat and melt the cheese until gooey and bubbly.
- Serve and Enjoy: Transfer the patties to a paper towel-lined plate to drain briefly. Serve hot on toasted buns with sliced tomatoes, lettuce, and a dollop of tartar sauce or spicy mayo for a classic tuna melt sandwich. Alternatively, enjoy them on their own with a side of coleslaw, pickles, or a crisp green salad.
Tips for Perfect Patties
- Drain Tuna Well: Excess liquid can make the mixture too wet, causing patties to fall apart. Press the tuna in a fine-mesh strainer to remove as much liquid as possible.
- Chill for Firmer Patties: If time allows, refrigerate the shaped patties for 10-15 minutes before cooking to help them hold together.
- Adjust Breadcrumbs: If using panko, you may need slightly less than ½ cup due to its lighter texture. Start with ⅓ cup and add more if needed.
- Test a Small Patty: Cook a small test patty first to check seasoning and texture, adjusting salt, pepper, or breadcrumbs as needed.
- Baking Option: For a lighter version, bake patties on a parchment-lined baking sheet at 400°F (200°C) for 10-12 minutes, flipping halfway, until golden.
Serving Suggestions
These tuna melt patties are incredibly versatile. Here are some creative ways to enjoy them:
- Classic Tuna Melt Sandwich: Serve on toasted sourdough or brioche buns with lettuce, tomato, and a smear of spicy mayo or tartar sauce.
- Slider Party Platter: Make smaller patties and serve on slider rolls with pickles and ketchup for a crowd-pleasing appetizer.
- Low-Carb Option: Skip the bun and pair with a side of avocado slices, cucumber salad, or roasted veggies.
- Salad Topper: Crumble warm patties over a bed of mixed greens with a lemony vinaigrette for a protein-packed meal.
- Dipping Delight: Serve solo with dipping sauces like ranch, honey mustard, or sriracha aioli for a fun snack.
Variations to Mix It Up
Customize your tuna melt patties with these fun twists:
- Spicy Tuna Melt: Add ½ tsp chili powder or a pinch of cayenne to the mixture, and top with pepper jack cheese.
- Mediterranean Vibes: Swap parsley for dill, add 1 tbsp chopped kalamata olives, and serve with tzatziki.
- Herb-Infused: Mix in 1 tsp dried dill or fresh chives for a fresh, herbaceous flavor.
- Crunchy Coating: Dip patties in extra panko or crushed crackers before frying for an ultra-crispy crust.
- Veggie Boost: Stir in ¼ cup finely grated zucchini or carrot (squeezed dry) for added nutrition.
Storage and Reheating
- Storage: Store leftover patties in an airtight container in the refrigerator for up to 3 days.
- Reheating: Reheat in a skillet over medium heat for 1-2 minutes per side to restore crispiness, or bake at 350°F (175°C) for 5-7 minutes. Microwaving is not recommended as it can make them soggy.
- Freezing: Freeze uncooked or cooked patties in a single layer on a baking sheet, then transfer to a freezer bag for up to 2 months. Thaw in the fridge before cooking or reheat cooked patties directly from frozen, adding 2-3 minutes to the cooking time.
Nutritional Information (Approximate, Per Patty, Based on 6 Patties)
- Calories: 150-170 kcal
- Protein: 14g
- Fat: 9g
- Carbohydrates: 5g
- Sodium: 400mg
Note: Values vary based on ingredient brands, cheese type, and serving size.
Why This Recipe Is a Keeper
These Golden Tuna Melt Patties are a brilliant way to reinvent the classic tuna melt with a crispy, handheld twist. They’re quick enough for a weeknight dinner, fancy enough for casual entertaining, and budget-friendly to boot. The combination of flaky tuna, creamy mayo, sharp cheddar, and zesty lemon creates a flavor explosion that’s both comforting and exciting. Plus, the recipe is endlessly adaptable to suit your taste or dietary needs.
Ready to Savor the Crunch?
Whip up a batch of these Golden Tuna Melt Patties and watch them disappear from the plate! Whether you’re piling them onto a toasted bun or enjoying them with a fresh salad, they’re sure to satisfy your cravings for something cheesy, crispy, and oh-so-delicious. Share your creations with us, tag your photos, and let us know how you made this recipe your own in the comments below!
Happy cooking! 🐟✨