Oreo Cream Cheese Cheesecake Sushi Roll: A Sweet Twist on a Classic 🍫🍣
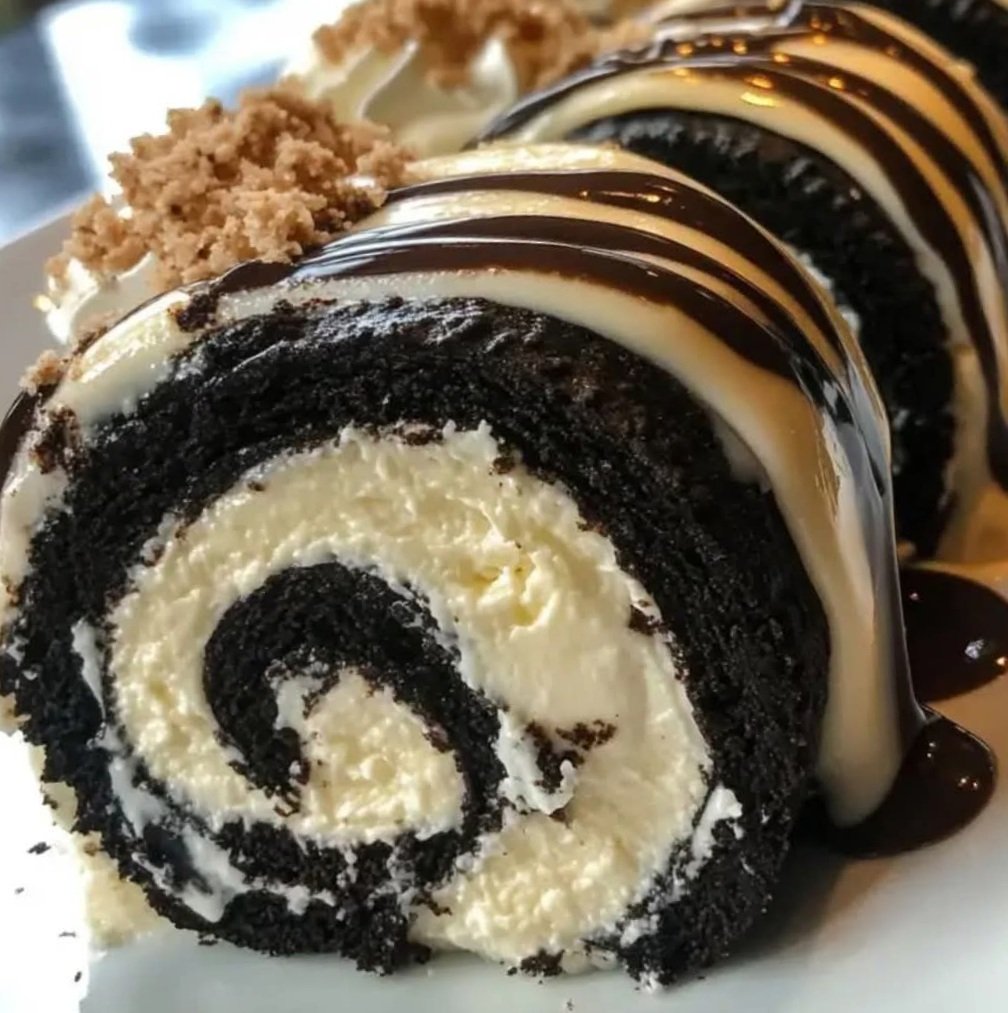
If you’ve ever dreamed of combining your love for sushi with your passion for dessert, this Oreo Cream Cheese Cheesecake Sushi Roll is about to make your day! This no-bake treat takes the creamy, tangy goodness of cheesecake, wraps it in a rich Oreo crust, and presents it in a playful sushi roll style—complete with a drizzle of chocolate “soy sauce” to tie it all together. It’s a fun, whimsical dessert that’s perfect for parties, themed dinners, or any time you want to surprise your guests with something unexpected. Let’s roll up our sleeves (and some cheesecake) and get started on this delightful fusion recipe!
Why You’ll Love This Recipe
This dessert is a showstopper—visually stunning and packed with nostalgic flavors. The combination of a crunchy Oreo crust and a velvety cream cheese filling is a match made in heaven, while the sushi roll presentation adds a playful twist that’s sure to spark conversation. Best of all, it’s a no-bake recipe, so you won’t need to turn on the oven. Whether you’re a sushi enthusiast or just a cheesecake lover, this treat brings together the best of both worlds in a way that’s both fun to make and delicious to eat.
Ingredients
For the Oreo Crust (Sushi “Nori” Layer):
- 20 Oreo cookies (with filling, for a rich chocolatey base) 🍪
- ¼ cup unsalted butter, melted (to bind the crust) 🧈
For the Cream Cheese Filling (Sushi “Rice” Layer):
- 1 (8 oz) package cream cheese, softened (full-fat for the creamiest texture) 🧀
- ¼ cup powdered sugar (for sweetness and smoothness) 🍬
- 1 tsp vanilla extract (to enhance flavor) 🌿
- ½ cup heavy cream, whipped to soft peaks (for a light, fluffy texture) 🥛
- 2 tbsp sour cream (for a slight tang) 🥛
For the Chocolate Drizzle (Sushi “Soy Sauce”):
- 4 oz semi-sweet chocolate, chopped (or use chocolate chips) 🍫
- 1 tbsp coconut oil (for a glossy, smooth drizzle) 🥥
Optional Toppings:
- ¼ cup crushed graham crackers (for a “ginger” garnish) 🍞
- Whipped cream dollops (for a “wasabi” effect) 🥛
- White chocolate shavings (for extra flair) 🍫
Equipment You’ll Need
- Food processor or rolling pin (to crush Oreos)
- Mixing bowls
- Electric mixer or whisk
- Parchment paper
- Sushi mat (or a clean kitchen towel wrapped in plastic wrap)
- Offset spatula or butter knife
- Double boiler or microwave-safe bowl (for melting chocolate)
- Sharp knife
- Piping bag (optional, for whipped cream)
Instructions
Step 1: Prepare the Oreo Crust
Place the Oreo cookies in a food processor and pulse until they form fine crumbs. If you don’t have a food processor, put the cookies in a zip-top bag and crush them with a rolling pin. Transfer the crumbs to a medium bowl and stir in the melted butter until the mixture resembles wet sand. The butter helps the crumbs stick together, mimicking the texture of sushi nori.
Lay a sheet of parchment paper on a flat surface and spread the Oreo mixture into a thin, even rectangle, about 10×12 inches and ¼ inch thick. Use the back of a spoon or your fingers to press it down firmly. If the mixture sticks, lightly grease your tools with a bit of butter. Set the crust aside while you prepare the filling.
Step 2: Make the Cream Cheese Filling
In a large mixing bowl, beat the softened cream cheese with an electric mixer on medium speed until smooth and creamy, about 1-2 minutes. Add the powdered sugar and vanilla extract, and continue beating until fully combined. Fold in the sour cream for a slight tang that balances the sweetness.
In a separate bowl, whip the heavy cream to soft peaks using a whisk or mixer. Gently fold the whipped cream into the cream cheese mixture in two batches, using a spatula to keep the filling light and airy. The result should be a smooth, spreadable filling that holds its shape but isn’t too stiff.
Step 3: Assemble the Sushi Roll
Spread the cream cheese filling evenly over the Oreo crust, leaving a ½-inch border along one of the long edges to help with sealing. Use an offset spatula or the back of a spoon to smooth the filling into an even layer, about ½ inch thick.
Place a sushi mat (or a kitchen towel wrapped in plastic wrap) under the parchment paper. Starting from the long edge without the border, gently roll the Oreo crust and filling into a tight log, using the mat to help you shape it. The parchment paper will keep the roll from sticking to the mat. Once rolled, wrap the log tightly in the parchment paper and refrigerate for at least 1 hour to firm up, making it easier to slice.
Step 4: Prepare the Chocolate Drizzle
In a double boiler (or a microwave-safe bowl), melt the semi-sweet chocolate and coconut oil together, stirring until smooth. If using a microwave, heat in 20-second intervals, stirring between each, to avoid burning. The coconut oil ensures a glossy, pourable consistency that mimics soy sauce. Set the chocolate aside to cool slightly.
Step 5: Slice and Decorate
Unwrap the chilled cheesecake roll and place it on a cutting board. Using a sharp knife, slice the roll into 1-inch pieces, wiping the knife clean between cuts for neat slices. You should get about 10-12 “sushi” pieces. Arrange the slices on a serving platter.
Drizzle the melted chocolate over the top of the rolls to mimic soy sauce. For a fun presentation, sprinkle crushed graham crackers on top to resemble pickled ginger, and pipe small dollops of whipped cream to look like wasabi. If desired, add a few white chocolate shavings for an extra touch of elegance.
Step 6: Serve and Enjoy
Serve the Oreo Cream Cheese Cheesecake Sushi Rolls chilled for the best texture. These playful bites are perfect for sharing at a party or enjoying as a unique dessert after dinner. For an authentic sushi experience, serve with chopsticks and small plates for dipping the chocolate drizzle!
Tips for Success
- Chill for Clean Slices: Don’t skip the chilling step—it helps the roll hold its shape when slicing. For even cleaner cuts, dip your knife in hot water before each slice.
- Filling Variations: Mix in crushed Oreo pieces into the cream cheese filling for extra texture, or add a layer of sliced bananas for a fruity twist.
- Chocolate Options: Swap semi-sweet chocolate for white chocolate or caramel sauce for a different drizzle effect.
- Make Ahead: Assemble the roll up to a day in advance and store it in the fridge, wrapped tightly. Add the chocolate drizzle and toppings just before serving.
- Storage: Store leftovers in an airtight container in the fridge for up to 3 days. The filling may soften the crust over time, so they’re best enjoyed within a day or two.
Why This Dessert Shines
This recipe is all about creativity and fun. The Oreo crust provides a rich, chocolatey base that contrasts beautifully with the creamy, tangy cheesecake filling. The sushi roll presentation adds a whimsical touch, while the chocolate drizzle ties it all together with a decadent finish. It’s a dessert that’s as much about the experience as it is about the flavor—perfect for sparking joy at any gathering.
Serving Suggestions
- Themed Party: Serve as part of a sushi-themed dessert table alongside other treats like mochi or matcha cookies.
- With a Beverage: Pair with a glass of cold milk, hot cocoa, or a dessert coffee like a mocha latte.
- Kid-Friendly: Skip the chocolate drizzle and let kids decorate their own rolls with sprinkles or gummy candies.
- Festive Flair: Add edible glitter or colorful sprinkles for a holiday or birthday celebration.
Nutritional Highlights
This dessert is an indulgence, with the cream cheese and Oreos providing richness and the chocolate adding sweetness. To lighten it up, use reduced-fat cream cheese or replace half the heavy cream with Greek yogurt. Each piece is a small treat, so enjoy in moderation as part of a balanced diet.
A Personal Note
I came up with this recipe for a friend’s sushi-themed birthday party, and it was a total hit! The combination of Oreo and cheesecake always feels like a nostalgic treat, but rolling it into sushi form made it so much more fun. Watching everyone’s faces light up as they took their first bite was the best part. I hope this recipe brings a little whimsy and sweetness to your table, too!