Cheesy Garlic Chicken Wraps: A Melty, Flavorful Delight
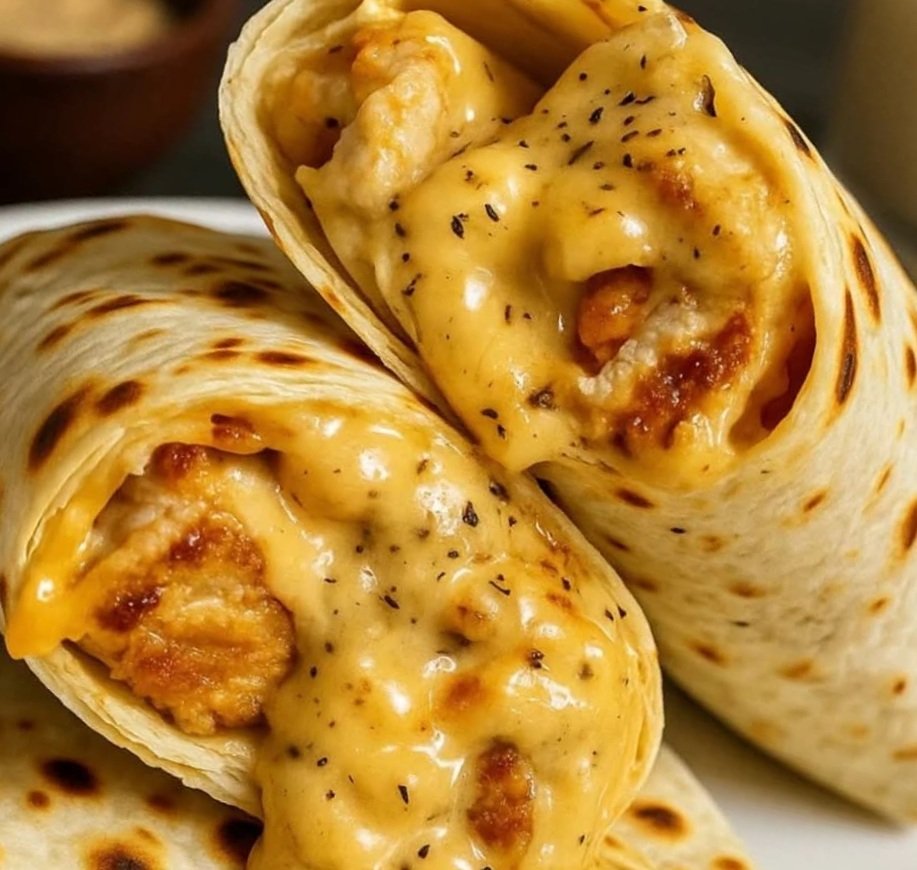
Indulge in the irresistible combination of tender chicken, gooey melted cheese, and aromatic garlic with these Cheesy Garlic Chicken Wraps! Perfect for a quick weeknight dinner, a hearty lunch, or even a party appetizer, these wraps bring together the rich creaminess of cheese with the savory punch of garlic-infused chicken, all nestled in a warm tortilla. The golden, melty goodness oozing from every bite, as seen in the image, promises a satisfying meal that’s both comforting and easy to prepare. Whether you’re cooking for yourself or feeding a crowd, this recipe is a versatile crowd-pleaser that can be customized to suit your taste. Let’s dive into making these delicious wraps that are sure to become a new favorite!
Ingredients for Cheesy Garlic Chicken Wraps
For the Chicken Filling:
- 2 cups cooked and shredded chicken (rotisserie chicken or leftover grilled chicken works great)
- 1 tablespoon olive oil (for sautéing)
- 3 cloves garlic, finely minced (for that bold garlic flavor)
- 1/2 teaspoon kosher salt (to enhance the flavors)
- 1/2 teaspoon smoked paprika (for a subtle smoky kick)
- 1/2 cup cream cheese, softened (for a creamy base)
- 1/2 cup shredded mozzarella cheese (for stretchy, melty texture)
- 1/2 cup shredded cheddar cheese (for a sharp, tangy bite)
- 2 tablespoons unsalted butter, melted (to amplify the garlic flavor)
For the Wraps:
- 4 large flour tortillas (10-inch size recommended for easy rolling)
Optional Garnishes (for serving):
- Fresh parsley or cilantro, chopped (for a fresh finish)
- Sour cream, salsa, or hot sauce (for dipping or drizzling)
Equipment Needed
- Large skillet
- Mixing bowl
- Spatula or wooden spoon
- Sharp knife or garlic press
- Baking sheet (optional, for warming tortillas)
- Aluminum foil (for wrapping, if desired)
Step-by-Step Instructions for Cheesy Garlic Chicken Wraps
Step 1: Prepare the Garlic-Infused Base
Heat 1 tablespoon of olive oil in a large skillet over medium heat. Add the 3 finely minced garlic cloves and sauté for 1–2 minutes, stirring constantly, until fragrant and lightly golden. Be careful not to burn the garlic, as it can turn bitter. Remove the skillet from heat and set aside to cool slightly—this garlic-infused oil will add depth to the chicken mixture.
Step 2: Mix the Chicken Filling
In a medium mixing bowl, combine the 2 cups of cooked and shredded chicken with the sautéed garlic and oil. Add 1/2 teaspoon of kosher salt and 1/2 teaspoon of smoked paprika, stirring to evenly coat the chicken with the seasonings. Next, add 1/2 cup of softened cream cheese, 1/2 cup of shredded mozzarella, and 1/2 cup of shredded cheddar cheese. Drizzle in the 2 tablespoons of melted butter and mix thoroughly until all ingredients are well incorporated, creating a creamy, cheesy filling. The warmth of the melted butter will help meld the flavors together. If the mixture feels too thick, you can add a teaspoon of milk or water to reach a spreadable consistency.
Step 3: Warm the Tortillas
To make the tortillas pliable and easier to roll, warm them slightly. You can do this by heating them in a dry skillet over medium heat for 20–30 seconds per side, wrapping them in a clean kitchen towel to keep them soft, or placing them on a baking sheet in a 350°F (175°C) oven for 2–3 minutes. Alternatively, microwave them for 10–15 seconds, covered with a damp paper towel. Keep the tortillas covered until ready to use to prevent them from drying out.
Step 4: Assemble the Wraps
Lay one warmed flour tortilla flat on a clean surface. Spoon about 1/2 cup of the cheesy chicken mixture onto the center of the tortilla, spreading it into an even layer but leaving a 1-inch border around the edges. Fold the bottom edge of the tortilla up over the filling, then fold in the sides and roll tightly to the top edge, creating a secure wrap. Repeat with the remaining tortillas and filling, making 4 wraps in total.
Step 5: Cook the Wraps
Return the skillet to medium heat (no additional oil needed if it’s non-stick; add a teaspoon of oil if needed). Place the wraps seam-side down in the skillet and cook for 2–3 minutes on each side, or until the tortillas are golden brown and crispy, and the cheese inside begins to melt and ooze out slightly, as seen in the image. For a softer texture, you can skip this step and serve the wraps as is, or wrap them in foil and bake at 350°F (175°C) for 10–12 minutes to melt the cheese further.
Step 6: Serve and Enjoy
Transfer the wraps to a serving plate and let them cool for 1–2 minutes to avoid burning your mouth on the hot cheese. Garnish with a sprinkle of chopped fresh parsley or cilantro for a burst of color and freshness, if desired. Serve warm with sides like sour cream, salsa, or a drizzle of hot sauce for an extra flavor boost. These wraps are perfect on their own or paired with a side salad or fries for a more filling meal.
Nutritional Information (Approximate per Wrap)
- Prep Time: 10 minutes
- Cook Time: 15 minutes
- Total Time: 25 minutes
- Calories: Approximately 350–400 kcal (varies based on tortilla size and cheese amount)
- Servings: 4 wraps
Note: Nutritional values are estimates and may vary depending on specific ingredients and portion sizes.
Tips for Perfect Cheesy Garlic Chicken Wraps
- Chicken Prep: Use leftover roasted or grilled chicken for convenience, or poach boneless chicken breasts and shred them. For a shortcut, pick up a rotisserie chicken from the store.
- Cheese Variations: Experiment with different cheeses like Monterey Jack, pepper Jack for heat, or a blend of your favorites. Add extra cheese inside or sprinkle some on top while cooking for an extra gooey layer.
- Garlic Boost: For an even stronger garlic flavor, add an additional clove or mix in a teaspoon of garlic powder with the seasonings.
- Make-Ahead Option: Prepare the filling in advance and store it in the refrigerator for up to 2 days. Assemble and cook the wraps when ready to eat.
- Freezer-Friendly: Assemble the wraps, wrap tightly in foil, and freeze for up to 1 month. Thaw overnight in the refrigerator before cooking as directed.
- Dietary Adjustments: Use low-fat cream cheese or a gluten-free tortilla to adapt this recipe for dietary needs.
Why You’ll Love These Cheesy Garlic Chicken Wraps
These wraps are a delightful fusion of creamy, cheesy goodness and savory garlic chicken, wrapped in a warm tortilla that’s crispy on the outside and tender inside. The image showcases the perfect melty cheese pull, hinting at the indulgent treat awaiting you. They’re quick to whip up, customizable with your favorite ingredients, and ideal for any meal of the day. Whether you’re enjoying them solo with a side of veggies or sharing them at a gathering, these wraps are a flavorful way to satisfy your cravings.
Serving Suggestions
Pair these wraps with a crisp green salad, roasted vegetables, or a bowl of tomato soup for a balanced meal. For a fun twist, cut them into bite-sized pieces and serve as an appetizer with a variety of dipping sauces. They also pair wonderfully with a cold drink like iced tea or a glass of white wine on a warm evening, such as this one on May 26, 2025, at 3:35 PM +01.
Storage and Reheating
- Storage: Keep leftover wraps in an airtight container in the refrigerator for up to 3 days.
- Reheating: Warm in a skillet over medium heat for 2–3 minutes per side or in the microwave for 30–60 seconds, though the skillet method preserves the crispness.
- Freezing: Follow the freezer tip above for long-term storage.