Homemade Peppermint Patties: A Cool, Chocolatey Treat 🍫🌿
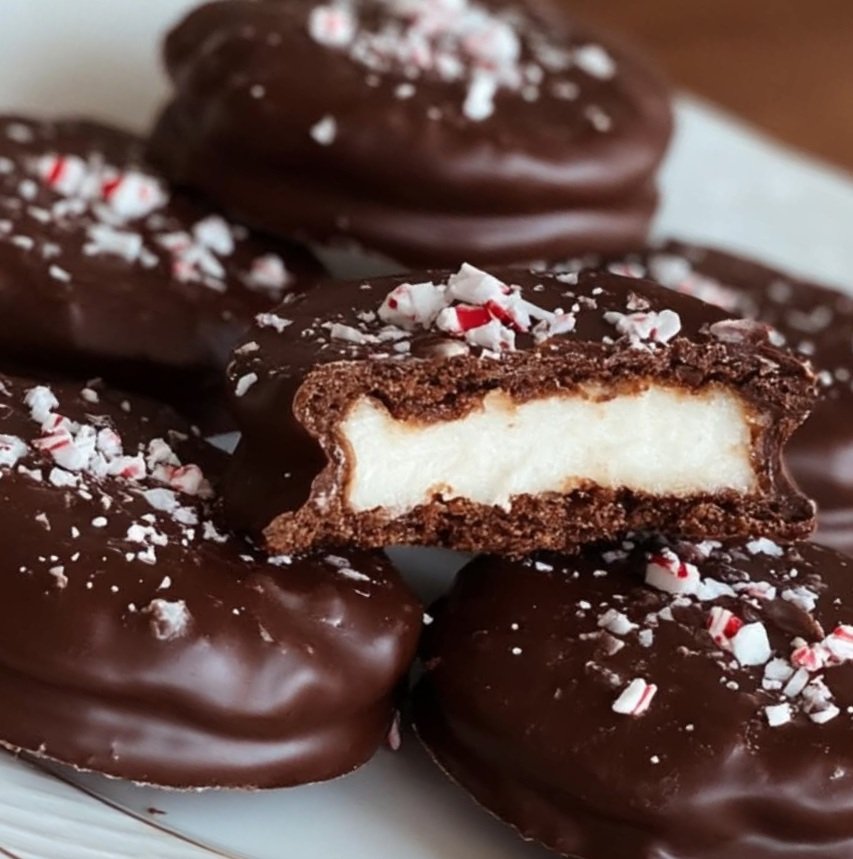
Craving a refreshing, minty dessert that’s as delightful to make as it is to eat? These Homemade Peppermint Patties are the perfect balance of cool, creamy peppermint filling and rich, dark chocolate coating—a classic treat that brings a touch of nostalgia to any moment. With just a handful of simple ingredients, you can whip up these little bites of heaven in no time. They’re perfect for gifting, sharing at gatherings, or savoring as a sweet indulgence on a quiet Saturday afternoon like today, May 24, 2025. While they’re often associated with the holiday season, these patties are a year-round delight that will leave you feeling refreshed and satisfied. Let’s dive into this easy recipe and create some minty magic!
Ingredients (Makes About 20 Patties)
For the Peppermint Filling:
- 2 cups (240 g) powdered sugar, sifted
- 2 tablespoons (28 g) unsalted butter, softened to room temperature
- 2 teaspoons pure peppermint extract (adjust to taste for a milder or stronger mint flavor)
- 2 tablespoons (30 ml) heavy cream (or half-and-half for a lighter option)
- Optional: A pinch of salt (to enhance flavors)
For the Chocolate Coating:
- 8 ounces (225 g) semi-sweet or dark chocolate, chopped (or chocolate chips—use 60%+ cacao for a rich flavor)
- Optional: 1 teaspoon coconut oil or vegetable oil (to make the chocolate smoother for dipping)
For Garnish (Optional):
- Crushed candy canes or peppermint candies, for a festive touch
- Flaky sea salt, for a sweet-salty contrast
- White chocolate drizzle, for a decorative flair
Equipment Needed
- Mixing bowl
- Electric hand mixer or stand mixer (optional, for easier mixing)
- Parchment paper or wax paper
- Baking sheet or tray
- Small cookie scoop or spoon
- Double boiler or microwave-safe bowl (for melting chocolate)
- Fork or dipping tool
- Measuring cups and spoons
Instructions
Step 1: Prepare the Peppermint Filling
In a medium mixing bowl, combine the softened butter, sifted powdered sugar, peppermint extract, and heavy cream. Using a spoon or an electric hand mixer, mix until a smooth, thick dough forms. The mixture should be soft but not sticky, holding its shape when rolled. If it’s too sticky, add a bit more powdered sugar (1 tablespoon at a time); if too dry, add a teaspoon more cream. Taste and adjust the peppermint extract if you prefer a stronger or milder mint flavor—start with 1½ teaspoons if you’re unsure, as peppermint extract can be potent!
Step 2: Shape the Patties
Line a baking sheet or tray with parchment paper or wax paper. Using a small cookie scoop or spoon, portion out the peppermint dough and roll it into small balls, about 1 inch in diameter (think the size of a large marble). Place each ball on the prepared tray and flatten it gently with your fingers or the bottom of a glass into a disc about ¼ inch thick and 1½ inches wide. Aim for uniform sizes so they chill and dip evenly. If the dough sticks to your hands, dust them lightly with powdered sugar.
Step 3: Freeze to Firm Up
Place the tray of peppermint discs in the freezer for 15–20 minutes, or until they are firm to the touch. This step makes them easier to dip in chocolate without losing their shape. Don’t skip this—it’s key for a smooth dipping process!
Step 4: Melt the Chocolate
While the discs are chilling, melt the chocolate. In a double boiler over low heat (or in a microwave-safe bowl in 20-second bursts, stirring between each), melt the chopped semi-sweet or dark chocolate until smooth. If desired, stir in 1 teaspoon of coconut oil or vegetable oil to make the chocolate thinner and easier to work with. Let the chocolate cool slightly—it should be melted but not hot, so it doesn’t melt the peppermint filling during dipping.
Step 5: Dip the Patties
Remove the peppermint discs from the freezer. Using a fork or a dipping tool, dip each disc into the melted chocolate, ensuring it’s fully coated. Tap the fork gently on the side of the bowl to remove excess chocolate, then place the patty back on the parchment-lined tray. Work quickly to prevent the peppermint filling from softening too much. If adding garnishes like crushed candy canes or flaky sea salt, sprinkle them on while the chocolate is still wet.
Step 6: Chill and Set
Once all the patties are dipped, refrigerate the tray for 20–30 minutes, or until the chocolate is fully set and hardened. For an extra decorative touch, you can drizzle melted white chocolate over the tops using a fork or piping bag before chilling.
Step 7: Serve and Store
Transfer the peppermint patties to a serving plate and enjoy! Store any leftovers in an airtight container in the refrigerator for up to 2 weeks—they’ll stay fresh and delicious. For longer storage, freeze them for up to 1 month; just let them thaw in the fridge for an hour before serving.
Serving Suggestions
These Homemade Peppermint Patties are a refreshing treat on their own, perfect for a sweet pick-me-up after lunch on this lovely Saturday, May 24, 2025. Serve them with a cup of hot cocoa, coffee, or peppermint tea for a cozy experience. They also make a thoughtful homemade gift—package them in a cute tin or cellophane bag tied with a ribbon for friends, family, or neighbors. Add them to a dessert platter alongside cookies and brownies for a festive spread, even if we’re a bit early for the holiday season!
Nutritional Information (Per Patty, Based on 20 Patties)
- Calories: Approximately 110 kcal
- Protein: 1 gram
- Fat: 5 grams
- Carbohydrates: 15 grams
- Sugar: 13 grams
Note: Nutritional values are approximate and may vary based on the type of chocolate and garnishes used.
Time Breakdown
- Preparation: 20 minutes
- Chilling (Freezing): 15–20 minutes
- Dipping and Setting: 30 minutes
- Total Time: Approximately 1 hour 5 minutes
Tips for Success
- Adjust Peppermint Flavor: Peppermint extract can vary in strength—start with 1½ teaspoons and taste the dough, adding more if needed. Too much can overpower the flavor.
- Smooth Dipping: If the chocolate starts to thicken while dipping, reheat it gently to keep it smooth. A thinner chocolate coating makes for easier dipping.
- Uniform Shapes: For perfectly round patties, use a small round cookie cutter to shape the discs after flattening.
- Avoid Melting: Work in small batches when dipping to keep the peppermint filling firm. If the discs start to soften, pop them back in the freezer for a few minutes.
- Storage Tip: Layer the patties between parchment paper in the container to prevent sticking.
Variations to Try
- Milk Chocolate Option: Swap the semi-sweet or dark chocolate for milk chocolate if you prefer a sweeter coating.
- Orange Mint Twist: Replace ½ teaspoon of peppermint extract with orange extract for a citrusy twist, reminiscent of chocolate-orange candies.
- Crunchy Add-Ins: Mix in 2 tablespoons of crushed peppermint candies into the filling for a bit of texture.
- Vegan Version: Use plant-based butter, coconut cream instead of heavy cream, and dairy-free chocolate for a vegan-friendly treat.
- Mini Bites: Make smaller patties (½-inch balls) for bite-sized treats, perfect for a candy bowl or party tray.
Why You’ll Love This Recipe
These Homemade Peppermint Patties are a delightful blend of cool mint and rich chocolate, offering a refreshing contrast that’s hard to resist. They’re surprisingly easy to make with just a few ingredients, yet they look and taste like a gourmet treat. Perfect for satisfying a sweet tooth or impressing guests, these patties are a fun project for a relaxing Saturday afternoon like today, May 24, 2025. Plus, they’re customizable—whether you love a bold mint flavor or a subtle hint, you can make them exactly to your liking. They’re also a fantastic make-ahead dessert, ideal for keeping on hand for unexpected cravings or visitors.
Share Your Minty Masterpieces!
We’d love to see your Homemade Peppermint Patties! Snap a photo of your chocolatey creations and share them on social media with our tag. Have a fun variation, like adding a colorful sprinkle or a unique flavor? Drop it in the comments below—we’re always excited to hear how you make this recipe your own!