Nun’s Puffs – Light, Airy, and Irresistibly Sweet Pastries
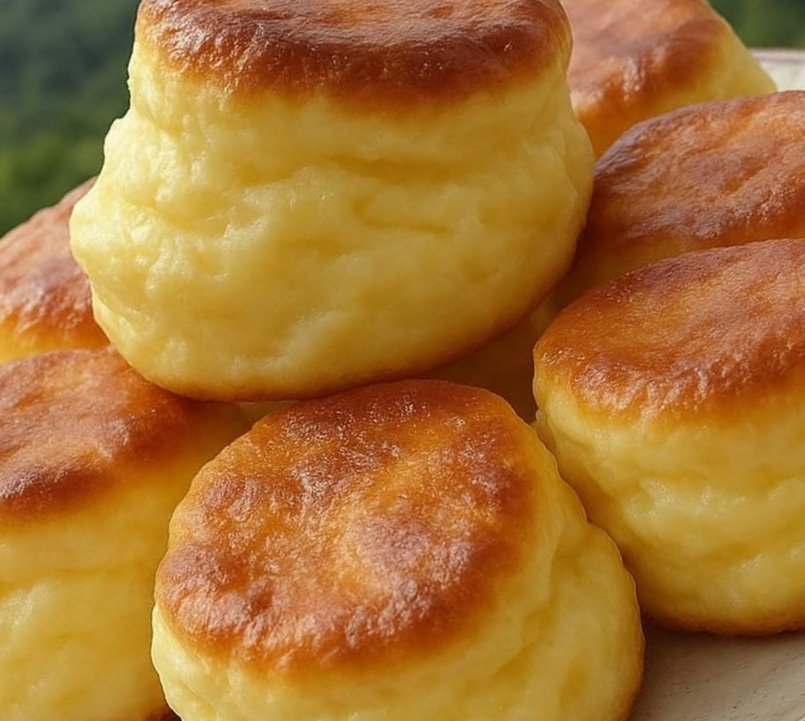
If you’re looking for a dessert that’s both elegant and easy to make, Nun’s Puffs are the perfect choice! These delicate, golden pastries are light, airy, and slightly sweet, with a texture that’s somewhere between a cream puff and a popover. Made with simple pantry ingredients like butter, milk, flour, and eggs, Nun’s Puffs are surprisingly quick to whip up, yet they look and taste like a bakery treat. Whether you’re hosting a brunch, celebrating a special occasion, or just craving something sweet, these puffs are sure to impress.
In this post, we’ll guide you through the process of making these delightful pastries, share their fascinating history, and offer tips to ensure perfect results every time. Plus, we’ll include creative variations, storage advice, and answers to common questions to make your baking experience seamless. Get ready to fill your kitchen with the irresistible aroma of freshly baked Nun’s Puffs!
What Are Nun’s Puffs?
Nun’s Puffs, also known as Pets de Nonne in French (meaning “nun’s farts” due to their light, airy nature), are small, puffed-up pastries made from a choux-like dough. The batter is simple, relying on eggs to create a hollow, airy interior and a crisp, golden exterior. Traditionally, these pastries are sprinkled with sugar for a touch of sweetness, but they can also be filled or topped with various flavors to suit your taste.
These treats are believed to have originated in French convents, where nuns crafted them as a simple yet indulgent dessert. Their whimsical name and delicate texture have made them a beloved classic in many cultures, and they’re perfect for both novice and experienced bakers.
Why You’ll Love Nun’s Puffs
Here’s why Nun’s Puffs deserve a spot in your recipe collection:
- Simple Ingredients: Made with pantry staples like butter, milk, flour, and eggs, they’re budget-friendly and accessible.
- Quick to Prepare: From start to finish, you can have these puffs ready in under an hour.
- Versatile: Enjoy them plain with a dusting of sugar, or get creative with fillings and toppings.
- Light and Airy: Their delicate texture makes them a refreshing alternative to heavier desserts.
- Perfect for Any Occasion: Serve them at breakfast, brunch, tea parties, or as a sweet snack.
Ingredients for Nun’s Puffs
This recipe uses just a handful of ingredients to create magic in your kitchen. Here’s what you’ll need:
- 1 stick butter (½ cup) – Unsalted, for rich flavor and a tender texture.
- 1 cup milk – Whole milk works best for a creamy batter, but 2% can be used.
- ¾ cup all-purpose flour – For the structure of the puffs.
- 4 large eggs – The key to the puffs’ airy, hollow interior.
- ½–1 tbsp sugar (optional) – For a subtle sweetness in the dough.
- Sugar for sprinkling – Granulated or powdered sugar for a sweet finish.
Equipment Needed:
- Medium saucepan
- Wooden spoon or spatula
- Mixing bowl
- Whisk or electric mixer
- Muffin tin or baking sheet
- Piping bag (optional, for shaping)
- Cooling rack
How to Make Nun’s Puffs – Step-by-Step Instructions
Making Nun’s Puffs is easier than you might think, and the results are absolutely delightful. Follow these steps for perfect puffs every time.
Step 1: Preheat the Oven and Prepare the Pan
- Preheat your oven to 400°F (200°C).
- Grease a 12-cup muffin tin generously with butter or non-stick spray to prevent sticking. Alternatively, you can use a baking sheet lined with parchment paper for freeform puffs.
- For extra insurance, dust the muffin cups lightly with flour and tap out the excess.
Step 2: Make the Batter
- In a medium saucepan, combine the ½ cup butter and 1 cup milk over medium heat. Stir until the butter is fully melted and the mixture is just beginning to simmer (do not let it boil).
- Remove the pan from the heat and add the ¾ cup flour and ½–1 tbsp sugar (if using) all at once. Stir vigorously with a wooden spoon until the mixture forms a smooth, thick dough that pulls away from the sides of the pan.
- Return the pan to low heat and cook the dough for 1-2 minutes, stirring constantly, to dry it out slightly. The dough should form a ball and leave a thin film on the bottom of the pan.
- Transfer the dough to a mixing bowl and let it cool for 3-5 minutes to avoid cooking the eggs.
- Add the 4 eggs one at a time, beating well after each addition with a whisk, wooden spoon, or electric mixer. The batter should be smooth, glossy, and slightly thick but pipeable.
Tip: The batter may look lumpy at first when adding eggs, but keep mixing until it becomes smooth.
Step 3: Shape the Puffs
- Spoon or pipe the batter into the prepared muffin tin, filling each cup about ⅔ full. Alternatively, drop tablespoon-sized portions onto a parchment-lined baking sheet, spacing them 2 inches apart.
- If desired, smooth the tops with a wet finger for a more uniform shape.
Step 4: Bake the Puffs
- Bake in the preheated oven for 20-25 minutes, or until the puffs are puffed up, golden brown, and crisp on the outside. Avoid opening the oven door during baking, as this can cause the puffs to collapse.
- Remove the puffs from the oven and transfer them to a cooling rack. Pierce each puff with a toothpick or skewer to release steam and prevent sogginess.
Step 5: Finish and Serve
- While the puffs are still warm, sprinkle generously with granulated or powdered sugar for a sweet, sparkly finish.
- Serve immediately for the best texture, or let them cool completely if filling or storing.
Tips for Perfect Nun’s Puffs
To ensure your Nun’s Puffs turn out light, airy, and delicious, keep these tips in mind:
- Measure Ingredients Accurately: Too much flour can make the puffs dense, while too little can prevent them from holding their shape.
- Don’t Skip the Steam Release: Piercing the puffs after baking helps maintain their crisp exterior.
- Use Room-Temperature Eggs: This helps the eggs incorporate more easily into the dough, creating a smoother batter.
- Bake Immediately: Once the batter is made, bake it right away to maximize puffiness.
- Experiment with Shapes: Use a piping bag for uniform puffs, or spoon the batter for a rustic look.
The History of Nun’s Puffs
Nun’s Puffs have a charming history rooted in French culinary tradition. The name Pets de Nonne (nun’s farts) is said to come from their light, airy texture, which resembles a delicate puff of air. Legend has it that these pastries were created by nuns in French convents, who were known for their resourceful and creative baking. The simple ingredients—flour, butter, milk, and eggs—made them an affordable treat for religious communities, and their whimsical name added a touch of humor to their reputation.
Over time, Nun’s Puffs spread beyond convents and became a beloved dessert in Europe and beyond. Today, they’re enjoyed in various forms, from plain sugar-dusted puffs to filled pastries with custard, whipped cream, or fruit. Their versatility and ease of preparation have kept them a timeless classic.
Variations to Try
Nun’s Puffs are a blank canvas for creativity. Here are some delicious ways to switch things up:
- Filled Nun’s Puffs: Slice the cooled puffs in half and fill with whipped cream, pastry cream, or lemon curd for a cream puff-inspired treat.
- Chocolate-Dipped Puffs: Dip the tops in melted dark or white chocolate and let them set for a decadent twist.
- Savory Puffs: Omit the sugar in the dough and add ½ tsp of herbs (like thyme or rosemary) or grated cheese for a savory appetizer.
- Citrus Zest Puffs: Add 1 tsp of lemon or orange zest to the batter for a bright, citrusy flavor.
- Glazed Puffs: Drizzle with a simple glaze made from powdered sugar and lemon juice or vanilla extract.
How to Store and Freeze Nun’s Puffs
Nun’s Puffs are best enjoyed fresh, but you can store them for later enjoyment with these tips:
- Room Temperature: Store unfilled puffs in an airtight container at room temperature for up to 1 day. Re-crisp them in a 350°F oven for 5 minutes before serving.
- Refrigerator: If filled, store in the fridge for up to 2 days. Note that the puffs may soften due to moisture from the filling.
- Freezer: Freeze unfilled, cooled puffs in a freezer-safe bag for up to 2 months. Thaw at room temperature and reheat in a 350°F oven to restore crispness.
Pro Tip: Avoid storing filled puffs for too long, as the filling can make them soggy.
Frequently Asked Questions (FAQs)
Why didn’t my Nun’s Puffs puff up?
If the puffs don’t rise, it could be due to undercooking the dough on the stove, adding eggs to hot dough, or opening the oven door during baking. Ensure the dough is cooked until it forms a ball, let it cool slightly before adding eggs, and keep the oven door closed.
Can I use a different type of milk?
Yes, you can use 2% milk or even plant-based milk like almond or oat milk, but whole milk gives the richest flavor and best texture.
Can I make Nun’s Puffs gluten-free?
Yes, substitute the all-purpose flour with a 1:1 gluten-free baking flour blend. The texture may be slightly different, but they’ll still be delicious.
How do I prevent soggy puffs?
Pierce the puffs immediately after baking to release steam, and avoid storing them in a humid environment. Serve filled puffs right away.
Can I make the batter ahead of time?
It’s best to bake the batter immediately after preparing it, as it relies on the eggs for puffiness. However, you can bake the puffs and store them for later.
Serving Suggestions
Nun’s Puffs are versatile and pair beautifully with a variety of accompaniments. Here are some ideas:
- With Coffee or Tea: Serve with a hot cup of coffee, chai, or Earl Grey tea for a cozy afternoon treat.
- Fruit Compote: Pair with a side of berry compote or fresh fruit for a refreshing contrast.
- Ice Cream: Serve warm puffs with a scoop of vanilla or raspberry ice cream for an indulgent dessert.
- Brunch Spread: Include them in a brunch menu alongside quiche, fresh fruit, and mimosas.
- Holiday Dessert: Dust with powdered sugar and serve as a light dessert for holiday gatherings.
Why Nun’s Puffs Are Perfect for Any Occasion
Nun’s Puffs are a delightful addition to any event, from casual brunches to elegant dinner parties. Their light texture and subtle sweetness make them a crowd-pleaser, and their versatility allows you to adapt them to any flavor profile or dietary need. Plus, their quick preparation and minimal ingredients make them a stress-free option for busy bakers.
Final Thoughts
Nun’s Puffs are a timeless treat that combines simplicity, elegance, and irresistible flavor. With their golden, airy texture and sweet, sugary finish, they’re sure to become a favorite in your baking repertoire. Whether you enjoy them plain, filled, or with a creative twist, these puffs are a delicious way to bring a touch of French tradition to your table.
Ready to bake these heavenly pastries? Gather your ingredients, preheat your oven, and let the magic of Nun’s Puffs fill your kitchen. Share your creations with us in the comments or on social media—we can’t wait to see how they turn out!