Indulge in the Ultimate Apple Slab Pie: A Dessert Made for Sharing! 🍏🥧✨
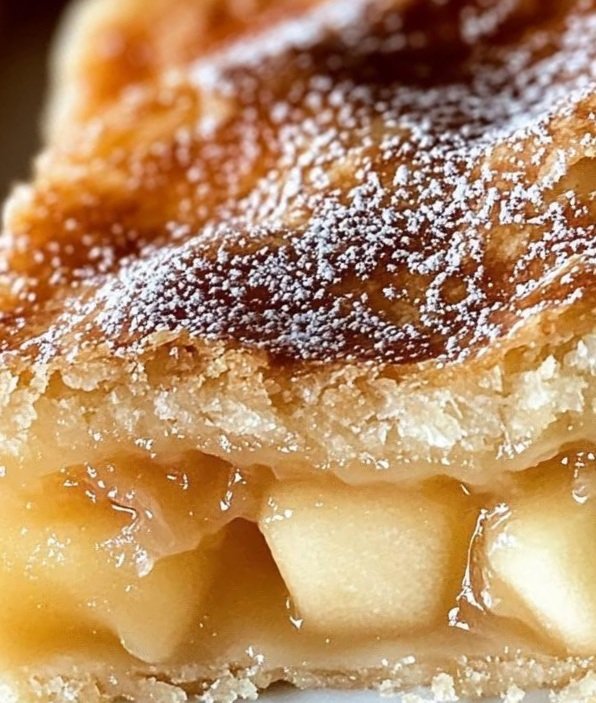
If you’re on the hunt for a dessert that’s as delightful to share as it is to eat, this Apple Slab Pie is your answer! Perfect for family gatherings, potlucks, or a cozy night in, this mouthwatering treat combines the classic flavors of apple pie with the convenience of a slab-style bake. With a flaky, buttery crust and a cinnamon-spiced apple filling, this pie is the epitome of comfort food. Whether you’re a seasoned baker or a beginner in the kitchen, this recipe will have you whipping up a crowd-pleasing dessert in no time. Let’s dive into the details of this heavenly Apple Slab Pie recipe that’s sure to become a staple in your baking repertoire! 🍏💚
Why You’ll Love This Apple Slab Pie
Before we get into the nitty-gritty of the recipe, let’s talk about why this Apple Slab Pie is a must-try. Unlike traditional round pies, a slab pie is baked in a large, rectangular pan, making it ideal for serving a crowd. It’s easier to slice into uniform pieces, ensuring everyone gets a fair share of that golden crust and juicy apple filling. The combination of tender apples, warm cinnamon, and a hint of lemon juice creates a filling that’s perfectly balanced—sweet, tart, and oh-so-comforting. Plus, the flaky crust, dusted with a touch of powdered sugar, adds a rustic charm that’s hard to resist. Whether you’re hosting a fall gathering or simply craving a taste of seasonal flavors, this pie delivers on every level. 🍂
Ingredients You’ll Need
Let’s gather the essentials for this delectable Apple Slab Pie. This recipe yields a large pie that can easily serve 12-15 people, making it perfect for sharing. Here’s what you’ll need:
- For the Crust:
- 2 1/2 cups all-purpose flour (spooned and leveled for accuracy)
- 1 tablespoon granulated sugar (to add a subtle sweetness to the crust)
- 1 teaspoon salt (to enhance the flavors)
- 1 cup unsalted butter, cold and cut into small cubes (cold butter is key for a flaky crust!)
- 1/2 cup cold water (add gradually to bring the dough together)
- For the Apple Filling:
- 4 cups sliced apples (about 4-5 medium apples; Granny Smith or Honeycrisp work beautifully for their tart-sweet balance)
- 3/4 cup granulated sugar (adjust slightly based on the sweetness of your apples)
- 1 teaspoon ground cinnamon (for that warm, cozy flavor)
- 2 tablespoons lemon juice (to brighten the flavors and prevent the apples from browning)
- 2 tablespoons all-purpose flour (to thicken the filling and soak up those juices)
- Optional Topping:
- Powdered sugar for dusting (for a beautiful, snowy finish)
- A scoop of vanilla ice cream or whipped cream (because pie is always better with a little extra indulgence!)
Step-by-Step Directions: How to Make Apple Slab Pie
Now that we’ve got our ingredients ready, let’s roll up our sleeves and get baking! Follow these detailed steps to create a slab pie that’s golden, flaky, and bursting with apple goodness.
- Preheat Your Oven
Start by preheating your oven to 375°F (190°C). This ensures your oven is nice and hot by the time your pie is ready to bake, giving you that perfectly golden crust. While the oven is heating up, you can prepare your dough and filling. - Make the Flaky Pie Crust
In a large mixing bowl, whisk together the flour, granulated sugar, and salt. This dry mixture forms the base of your crust. Next, add the cold, cubed butter. Using a pastry cutter (or your fingertips if you don’t have one), cut the butter into the flour mixture until it resembles coarse crumbs with pea-sized pieces of butter. This step is crucial for achieving that flaky texture we all love in a pie crust. Be careful not to overmix—you want those butter pieces to stay intact for maximum flakiness. Gradually add the cold water, one tablespoon at a time, mixing with a fork until the dough just comes together. It should be slightly shaggy but hold together when pressed. Divide the dough into two portions (one for the bottom crust and one for the top), wrap in plastic wrap, and chill in the refrigerator for about 15 minutes to make it easier to roll out. - Roll Out the Dough
On a lightly floured surface, roll out one portion of the dough into a large rectangle, about 1/8-inch thick, to fit a 10×15-inch baking sheet or jelly roll pan. Carefully transfer the dough to the pan, pressing it gently into the bottom and up the sides. Trim any excess dough if needed, but leave a little overhang to crimp the edges later. Place the pan in the fridge while you prepare the filling to keep the dough nice and cold. - Prepare the Apple Filling
In another large bowl, combine the sliced apples, granulated sugar, ground cinnamon, lemon juice, and flour. Toss everything together until the apples are evenly coated. The lemon juice not only adds a bright, tangy note but also helps prevent the apples from browning while you work. The flour will thicken the juices as the pie bakes, ensuring your filling isn’t too runny. If you like a bit of extra warmth, you can also add a pinch of nutmeg or allspice to the filling for a deeper flavor profile. - Assemble the Pie
Remove the prepared pan from the fridge and pour the apple filling into the crust, spreading it out evenly. Roll out the second portion of dough into another large rectangle and carefully place it over the apples to form the top crust. Trim any excess dough, then crimp the edges by pressing the top and bottom crusts together with your fingers or a fork to seal them. To allow steam to escape during baking (and prevent a soggy pie), cut a few slits or decorative shapes into the top crust. For an extra touch of elegance, you can brush the top with an egg wash (1 egg beaten with 1 tablespoon of water) and sprinkle with coarse sugar for a shiny, sparkly finish. - Bake to Golden Perfection
Place your assembled slab pie in the preheated oven and bake for 45-50 minutes, or until the crust is a glorious golden brown and the apple filling is bubbling through the slits. If the edges start to brown too quickly, you can cover them with strips of aluminum foil to prevent burning. The aroma of cinnamon and apples filling your kitchen will be absolutely irresistible! - Cool and Serve
Once baked, remove the pie from the oven and let it cool on a wire rack for at least 20-30 minutes. This cooling time allows the filling to set, making it easier to slice into neat squares. Dust the top with powdered sugar for a beautiful finishing touch, then cut into squares or rectangles. Serve each piece warm with a scoop of vanilla ice cream or a dollop of whipped cream for the ultimate dessert experience. Enjoy every flaky, fruity bite! 🥧
Tips for the Perfect Apple Slab Pie
- Choosing the Right Apples: For the best texture and flavor, opt for a mix of tart and sweet apples. Granny Smith apples provide a nice tartness, while Honeycrisp or Fuji add natural sweetness. Peeling the apples is optional, but it creates a smoother filling.
- Keep It Cold: Cold butter and cold water are essential for a flaky crust. If the dough starts to feel too warm while you’re working with it, pop it back in the fridge for a few minutes.
- Make It Ahead: You can prepare the dough and filling a day in advance. Assemble and bake the pie the day you plan to serve it for the freshest results.
- Storage: Store any leftovers in an airtight container at room temperature for up to 2 days, or in the refrigerator for up to 5 days. Reheat slices in the oven at 300°F (150°C) for 10 minutes to restore that freshly baked crispness.
Why This Recipe Is Perfect for Fall
There’s something undeniably magical about baking with apples in the fall. The crisp air, the changing leaves, and the cozy vibes make it the perfect season to enjoy this Apple Slab Pie. The warm cinnamon and tender apples capture the essence of autumn, making this dessert a go-to for Thanksgiving celebrations, harvest parties, or simply a quiet evening by the fireplace. Pair it with a hot cup of apple cider or a pumpkin spice latte for the ultimate fall treat. 🍁
Get Creative with Variations
Want to switch things up? Here are a few ideas to customize your Apple Slab Pie:
- Add Some Crunch: Toss in a handful of chopped pecans or walnuts with the apple filling for a delightful crunch.
- Caramel Drizzle: After baking, drizzle the cooled pie with homemade or store-bought caramel sauce for an extra layer of decadence.
- Mixed Fruit Filling: Combine apples with other fruits like pears or cranberries for a unique twist on the classic recipe.
- Lattice Top: Instead of a solid top crust, create a lattice pattern with strips of dough for a stunning presentation.
Share the Love!
This Apple Slab Pie isn’t just a dessert—it’s a labor of love that brings people together. Whether you’re baking for a holiday gathering, a family dinner, or just because you’re craving something sweet, this pie is sure to impress. Snap a photo of your creation and share it with us using the hashtags #AppleSlabPie, #BakingLove, #DessertGoals, #PiePerfection, and #FallFlavors—we’d love to see your masterpiece! If you have any tips, tricks, or favorite variations, drop them in the comments below. Happy baking! 🥧💚
Nutritional Information (Per Serving)
- Calories: Approximately 320 kcal
- Fat: 16g
- Carbohydrates: 42g
- Sugar: 22g
- Protein: 3g
(Nutritional values are approximate and may vary based on portion size and ingredients used.)
Final Thoughts
This Apple Slab Pie is more than just a dessert—it’s a celebration of simple ingredients coming together to create something truly special. With its buttery crust, juicy apple filling, and warm spices, it’s the kind of treat that makes memories. So, what are you waiting for? Preheat that oven, gather your ingredients, and let’s bake a pie that’s as beautiful as it is delicious. Your friends and family will thank you! 🍏🥧✨